AGENT SKILL
Design & Frontendanatomy: turn a technical concept into a real machine, a zero-dependency isometric figure skill with a 12-check geometry audit
wheresryan22/anatomy
A standard Agent Skill that makes Claude Code, OpenCode or Codex explain a technical idea by inventing a real machine (a pin-tumbler lock for a cache key, a gantry plotter for one shared GPU context) and drawing it as four-tone isometric SVG with a zero-dependency kit of about 16,200 lines, plus optional WebGL shaders and a beta 3D mode. Eight examples ship with their built pages committed, and CI on macOS with Node 22 rebuilds each one and requires byte-identical output.
Editor's takeWhat is most worth stealing is that it ships its own falsification tooling: twelve checks in kit/audit.mjs (clearances, solid clearances, terminals, loose ends, supports, folds, self-overlaps, crowding, stand-in shapes, wobble, seats, depth order) plus scripts/lines.mjs demanding 'line ends: 0', which turns 'looks fine' into countable failures. It also states outright that a stand-in shape that quiets the audit is itself a bug, and the coverage check exists to catch it. Aesthetics are numeric too: bevels 0.4-1.6, screw dots 0.4-0.55, the subject filling 55-65% of the card, a device ratio cap of 1.5, and a 3D bend bound of R ≥ 2r / sin²(e − θmax). CI rebuilds every example in both themes and requires an empty git diff, so kit compatibility is a machine guarantee. The limits are stated just as honestly: not a chart library (no axes or series), machines, instruments, tools and furniture only, 3D self-reported beta at roughly 20 fps for 380 parts, and one figure costs a long session.
npx skills add wheresryan22/anatomy -g -a claude-codeOne premise: the object is the explanation
anatomy (MIT, by Ryan / @wheresryan22, 4,600+ stars and 350+ forks, repository created 2026-10-08, main language JavaScript, site skills.wheresryan.sh/anatomy) is a standard Agent Skill: the repository root holds a single SKILL.md, and the repository is the skill folder. The problem it attacks is narrow and concrete. When a model is asked to explain a technical idea, it should not draw boxes, arrows and labels. It should invent a real, well-made physical thing whose working is the concept.
The concept-to-object table in SKILL.md is the heart of the skill, and it is what separates this from a bag of drawing prompts:
| Concept to explain | Object it builds |
|---|---|
| One shared GPU context serving many canvases | A gantry plotter: one print head visiting 16 wells |
| A cache key that skips work when nothing changed | A pin-tumbler lock: when every pin matches, the plug turns and nothing is redrawn |
| Seven render targets with different bytes per texel | A chest of seven drawers, each as deep as its bytes |
| A separable blur (49 x 49 taps vs 49 + 49) | A bed-of-nails stamp beside two combs on rails |
| A spring that presses and leans | A test rig with springs, a probe and a dial gauge |
| A height profile | A profile (contour) gauge pressed against the edge |
| Light that depends on facing | A small photo studio: key and fill lamps around a turntable |
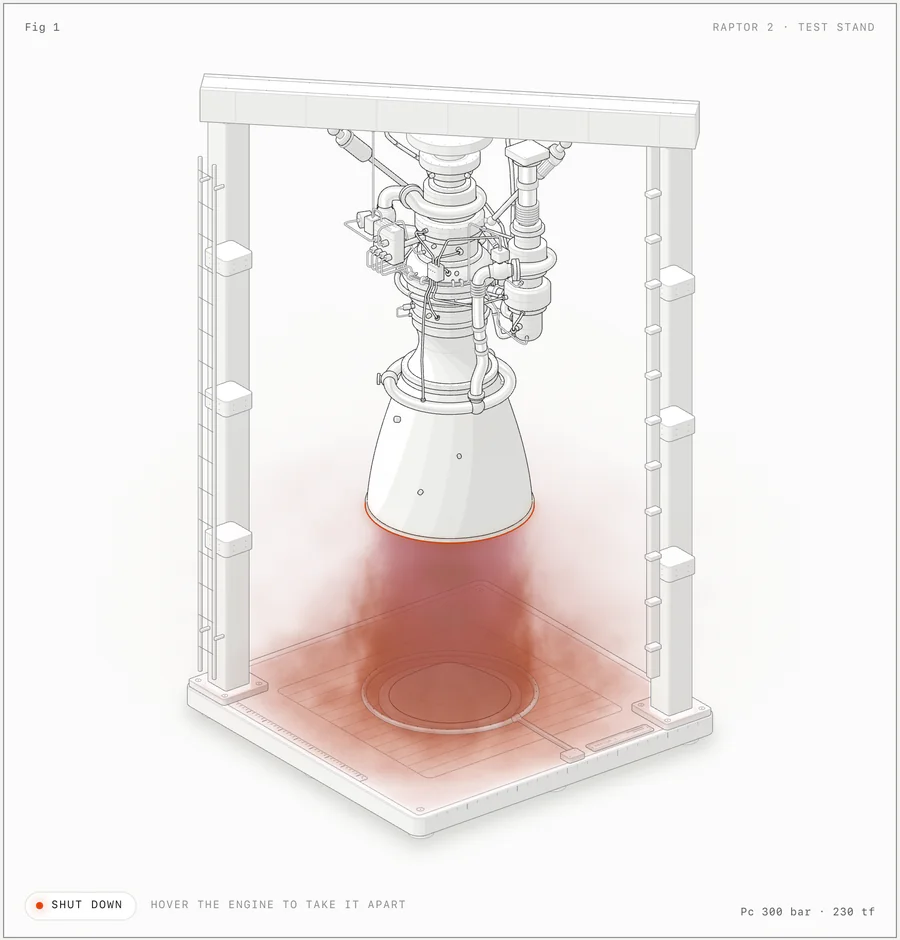
examples/raptor-engine, light theme, firing. The engine and the stand are SVG; the plume, shock, splash and steam are WebGL shaders in the same isometric camera, rendered between the back and the front SVG layer.The skill also names the two ways this premise fails in practice. Too abstract: stacked plates, floating slabs or labelled boxes that do not read as anything. Too flat and bland: one big slab with a few lines on it, with no volume, no parts and nothing to discover. Both have the same cure: a recognisable machine built from many small, precise, purposeful parts.
Density is stated as a testable two-level rule rather than an adjective. At 1x the figure reads as one clear machine; at 4x every region still has something true to find. A bare face or an empty corner is not restraint under this standard, it is unfinished work. And detail has to be purposeful, never noise: every part sits on another part, ends on an edge, and fades rather than stops.
A ten-step workflow that starts with an estimate
SKILL.md fixes the order of work and says outright that the concept and the parts list come before any geometry, because most of the quality is decided there. Step one is the newest addition and aims straight at the habit of silently grinding for six hours:
| Tier | Scope | Estimate | What to do |
|---|---|---|---|
| Figure | One mechanism, 40-80 parts, SVG with at most one WebGL layer | 30-90 minutes | Build it without asking |
| Hero | A dense object, several WebGL layers or one 3D subject, 80-150 parts | 2-4 hours | Say so, then build it unless the user asked for something quick |
| Epic | A whole vehicle, building or plant with many moving systems, or the 3D mode on more than one subject | 6 hours or more | Do not start it. Give the estimate, propose a Hero version that keeps the core idea, list what the full version would add, and wait for the user to choose |
Whatever the tier, there must be a working page that opens in the browser within the first hour, and the figure is deepened from there. date is run at the start and at each step, and when a step runs past twice its share of the estimate the model has to report where it stands and what is left. Writing the time box into the skill body instead of into an ad-hoc prompt is unusual among skills of this kind.
The remaining nine steps: truth first (collect the real sizes, counts, thresholds and curves of the thing being explained, so the readout, the motion and the caption are all true, and write the model as a small pure module like rig.ts in the test-rig example when you can); invent the object (say in one sentence what moves and what that motion means, and never copy a reference image: take its finish, not its object); write the parts list (at least 40 parts, grouped into base, structure, mechanism, controls and the subject itself, with every part sitting on another part); plan the world (world units of about 1 px of the real thing, x and y on the floor and z up, azimuth 45° by default and 35-60° to show the long side, elevation 30° or higher to look into something open, 44° for the ripple tank, then fit with fitProjection(points, width, height, { pad, azimuth })); build geometry once (precompute every static path, build moving parts once at a rest position and move them with translateAlong, rebuild per frame only what actually changes shape); paint back to front and bottom to top (split anything that wraps another part into a back half and a front half: springs around a rod, frame bars around a carriage); frame it (a card with Fig n top left, a short title top right, the interaction hint bottom left and the live readout bottom right, legend and true caption under the card, words kept out of the drawing apart from at most one tiny engraved label); make it live (calm time-based motion with exponential follow or real springs, an idle tour that loops, pointer and keyboard response, offscreen stop, stillness under prefers-reduced-motion, attributes written on refs instead of re-rendering per frame); and verify like a critic.
kit/: about 16,200 lines with zero dependencies
The bundled kit/ is where the figures are actually drawn, roughly 16,200 lines in total. Apart from React for the React components it has no dependencies at all: build scripts, drawing library and checks use only Node's built-in modules, so there is no npm install step.
| File | Lines | What it is for |
|---|---|---|
kit/iso-kit.ts / .mjs | 842 / 674 | The whole core: camera, solids, a parts library, an SVG string renderer, card and page builders, and ISO_CSS. The TS file is copied into a project; the ESM file is imported directly by Node scripts |
kit/lathe.mjs | 1,184 | Round parts along any axis: frameAlong, lathe (smooth shading switches on by itself for any profile with a smooth knot), bandsOf (one curved body cut into depth-sortable bands that share one surface), sphereOf, saddleOf, rodOut for a rod sliding out of a gland, fillet for pipe routes |
kit/tube.mjs | 306 | tubePieces splits a 3D pipe or cable into depth-sortable chunks, with breaks, gaps under collars and clamps, elliptical end caps and rings for a braid, corrugation or wrap that follows the cross-section through every joint; crossingsOf finds where a route passes through a clamp |
kit/audit.mjs | 1,913 | The geometry proof: recorder collects, settle resolves depth keys, and auditOrExit is the --audit hook that exits non-zero on any problem |
kit/gl.mjs + gl-shared.mjs | 184 + 184 | The in-drawing WebGL layer: GLSL_ISO (the same camera in GLSL, including rayOf and pixelOf), glLayer, and the JS envelopes smooth, burst and settle |
kit/turn*.mjs | 3,610 + 3,800 + 1,355 + 1,096 | The optional 3D mode: runtime, builder and orbit audit, plus one experimental variant that is not yet documented or used by the examples |
kit/react/draw.tsx / live.tsx | 205 / 140 | Server-safe components (Solid, Line, Wire, Dots, FaceText, IsoFigure, Plate) and "use client" hooks (useReadout, useLoop, useEased, useInView, useStillness) |
Shading is a fixed four-tone language keyed on facing. extrude returns four side tones by facing plus a lighter top, and that is kept for anything with height; flat is only for floors and inlays thinner than 1 unit. The tone hierarchy is fixed too: base and feet are lo, structure is mid, the subject is hi, and exactly one accent is lit (white in dark, black in light), marking the part the reader should watch. Grooves are faint, minor ticks lo, major ticks mid, the zero mark hi. Colour is used only when colour is the subject, such as red, green and blue channels.
Detail is specified numerically rather than by taste: bevels of 0.4-1.6, grooves inset 3-5 from an edge, screws as 0.4-0.55 dots with a ring at the corners of plates, knurls on knobs, ruler ticks every 4-5 units with a major every 5th, a label plate with three rule lines standing in for engraving. Compositionally the figure is centred and fills about 55-65% of the card, the scale stays consistent across a set of figures, and it still has to read at 390 px wide.
The audit: turning "looks right" into countable failures
This is where anatomy differs most from other figure-producing skills. It does not only demand good output, it ships a machine that can falsify it. kit/audit.mjs is used in three moves:
A.recorder(P, { order, spring })   // record each part's true shape and route as the helpers draw it
A.settle(R, P)                     // ray-cast every overlapping pair for true depth, then set the painter's keys
A.auditOrExit(R, P)                // node build.mjs --audit; exits non-zero on any problem
The important part of settle is that it does not only solve the rest pose. Depth is recomputed at rest, apart, and in every replayed frame of the explode. Twelve checks run: clearances, solidClearances, terminals, looseEnds, supports, folds, selfOverlaps, crowding (with slender solids treated as lines), coverage (stand-in shapes), wobble, seats and depthOrder. The run must end with audit passed and every failing line at zero.
Two accompanying rules are written extremely hard. An interlock is fixed in the geometry, never with a key bias. And you must record the true shape of what you draw: a stand-in shape that silences the audit is itself a bug, and coverage exists to catch it. The pipe and cable rules are quantified in the same spirit: keep about 1.5 radii of clearance to everything except a line's own connection, run lines beside the structure rather than across the subject's face, and gap a pipe wherever a flange, band, bellows, clamp or valve wraps it. A pair of items that cannot be ordered on screen is an interlock, and the fix is a cut or a tangent contact, never a bias.
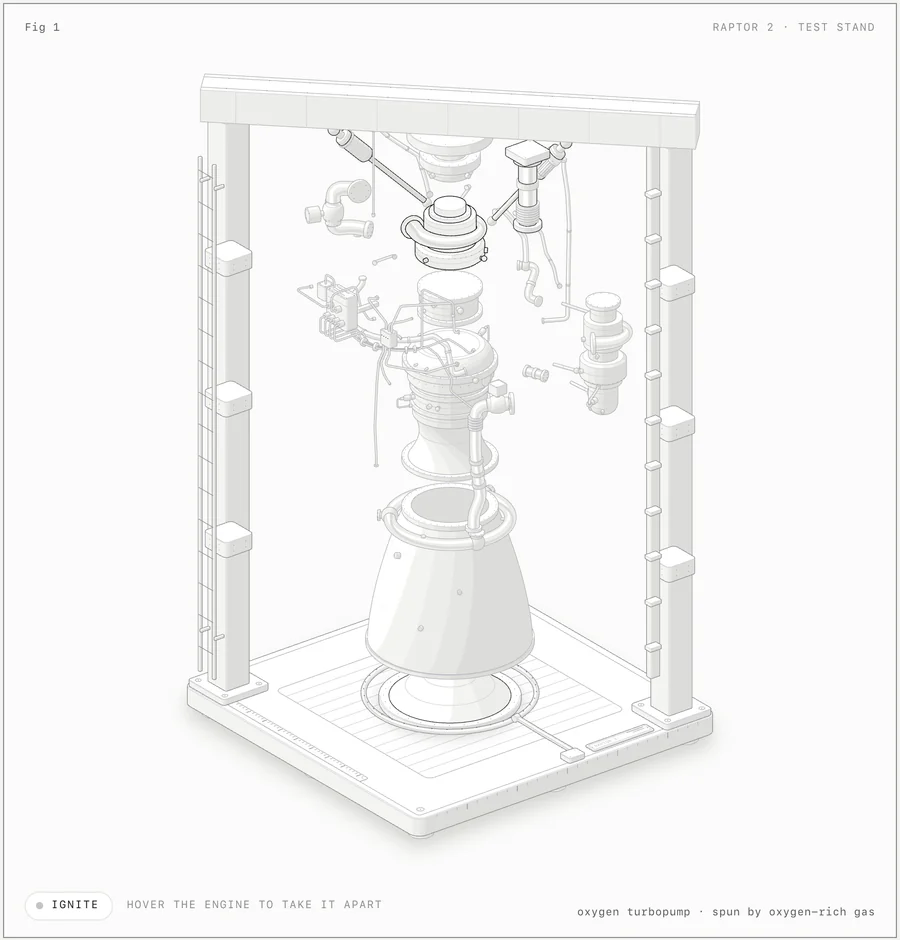
examples/raptor-engine in its apart pose: hover takes it apart into 11 assemblies with staggered springs and per-frame depth re-sorting. The audit has to prove that nothing passes through anything at rest, apart, and in every frame in between.Lines must resolve: line ends: 0
The geometry audit never sees line markup, so there is a separate check for it. scripts/lines.mjs walks every texture line on a built page in headless Chrome (seams, rules, ribs, ticks, pointers) and requires each one to end on a stroke, a dot or an outline. Failures are ringed with --out and the script exits 1. It must print line ends: 0, on the light page as well as the dark one, and in every resting pose through drive.mjs's ["lines"] action.
node examples/raptor-engine/build.mjs --audit          # must end with audit passed
node scripts/lines.mjs examples/dial-indicator/dial-indicator.html --out shots/lines.png
node scripts/lines.mjs examples/dial-indicator/dial-indicator-light.html --out shots/lines-light.png
node scripts/capture.mjs page.html --out shots/phone.png --width 390
node scripts/capture.mjs page.html --out shots/joint.png --zoom 200,80,220,170   # 4x close-up
node scripts/drive.mjs page.html '[["slow",0.05],["key","i"],["sheet","shots/ignite.png",100,16]]'
The texture rules are of the same family. Ribs, bolt circles, rule lines, seams and grooves never stop in the middle of a surface: they end on a real edge or fade out. ribsOf and dotsOf take fade, a rib row can end on its seams with seams: true, a line on a box wraps its corners with k.sideSeam, a single line that genuinely must stop ramps out with fadeLineSvg, and a row whose features face up is seen all round with all: true. A texture on a pipe (braid, corrugation, wrap) follows its cross-section and runs through every chunk joint via tubePieces(…, { rings }); a dashed stroke down the centreline is not acceptable. Only rule lines standing in for printed text, a needle's tail and a pointer's tip may stop on a bare face, and they must be marked free. Leader lines, balloons, dimension arrows and labels floating in the air do not appear at all.
WebGL that lives inside the drawing
Shaders are only for what lines cannot draw: fire and exhaust, water and caustics, real lamp light, glow, steam. The parts stay SVG. The layer stack is fixed: a back SVG holds what the effect covers, a canvas in the middle holds the effect (pointer-events: none), and a front SVG holds what covers it. A part on both sides gets split.
The technical core is world space in the same camera. Every shader point is built from onFloor, onWallX and onWallY, or by marching the pixel's ray rayOf(vb) + t·towardViewer(), and everything is sized in world units times uK. Anything lying on a plane therefore registers exactly with that plane's SVG lines, which is why the effect reads as part of the drawing rather than pasted over it.
The remaining rules all grew out of real faults. Nothing pops: every uniform rides an envelope with an attack and a decay (burst for events, settle for levels), phase changes are crossfades driven by the physical quantity, and a fade-out only gets darker. No hard cut-offs: every term reaches zero before any if, before any bound or canvas edge, and even before any cell edge of a cell noise. Content seen through an opening is masked twice (once in its own plane, once by the opening in the face plane, multiplied). Use tonemap() and dither. In the dark theme a canvas that only adds light uses premultiplied output with mix-blend-mode: screen, while one that must also darken (the ripple tank's water) stays normal-blended.
The light theme is the one that ships, and its shaders are designed for paper: normal premultiplied alpha and never screen; write the colour the paper should show and solve for the ink; a glow is a saturated body with a pale core, a coloured rim and an alpha floor, not a darkened dark-theme glow, which is exactly what produced the Raptor's "red ink smoke". On top of that, what the light falls on takes a tint while the cavity holding it gets a darker physical ground (soot, refractory, water depth); hot bodies follow one blackbody ink table shared with the no-WebGL fallback; ink only grows with light, so a fade happens once on the finished ink and never term by term; ink ends at each stroke's inner edge; and ink is measured per frame, where it has to follow the light monotonically.
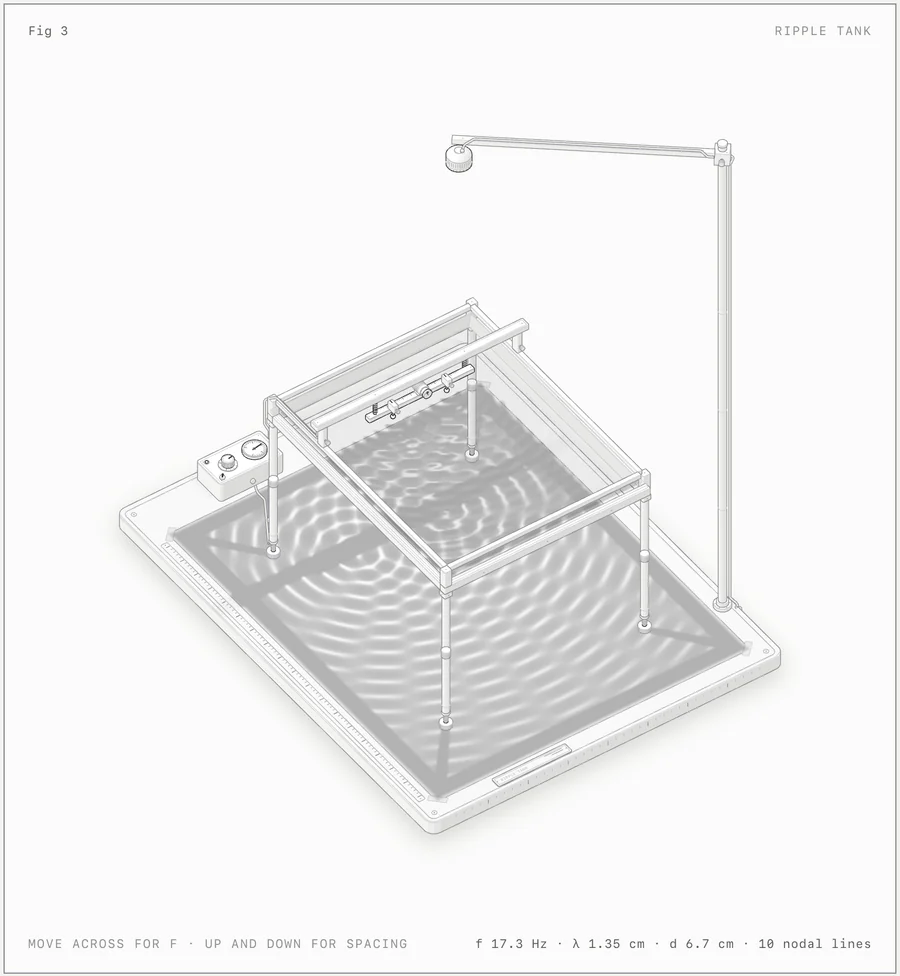
examples/ripple-tank: SVG apparatus over two WebGL layers (lamp light, shadows and caustics on the paper, and the water's reflections and glass), both registered to the isometric planes and driven by a pure dispersion and optics model in model.mjs. A frequency change travels out from the dippers through a history texture.Restraint is part of the contract as well: the device ratio is capped at 1.5, rendering happens only while the effect is active and onscreen, reduced motion gets one still frame, and the SVG must still read without WebGL.
The 3D mode (beta): re-projected and re-shaded every frame
3D is an option like WebGL, used only when a part moving in depth is the idea: a dial or turntable that turns, fingers that flex, a piece that breaks off and falls. Everything else in the figure stays static kit art.
The implementation is nothing like a conventional three.js scene. The live parts are the kit's own picture. Each frame, convex kit primitives (prisms, rounds, domes, balls with flats, lathes, tubes) are re-projected and re-shaded by the kit's rules, so a turn by θ is literally the kit drawing at azimuth a − θ. Order comes from separating planes: same-group pairs get a plane fixed in the group, pairs on different links get one fixed in their common frame, and the rest are solved each frame. The orbit audit proves there are no cycles at any angle or in any clip frame.
The rest of the constraints are just as firm. Contacts are flush, tangent or rim-on-flat; joints are coaxial knuckle discs on the child group that touch the parent's link, or the audit calls the whole child group loose. No live line may span two moving groups: a cable crosses a joint through a clip on each side, or reaches the turntable through a slip ring at the hub. Live tubes bend in near-horizontal planes or inside fittings and never point along the view, and a bend needs R ≥ 2r / sin²(e − θmax), which is 8r when flat and 21r on a ±12° hinge. Materials (gold, chrome, steel, gunmetal, rubber, brass, copper) each have a light and a dark set, with tones still coming from facing. Free groups break off without a jump. Coaxial parts are fixed pictures with turning textures. Shaders anchor to a group with controller.anchor or toGroup and occlude a front canvas with coverOf, while world effects such as smoke, falling sparks and oil on the bench stay out of group space.
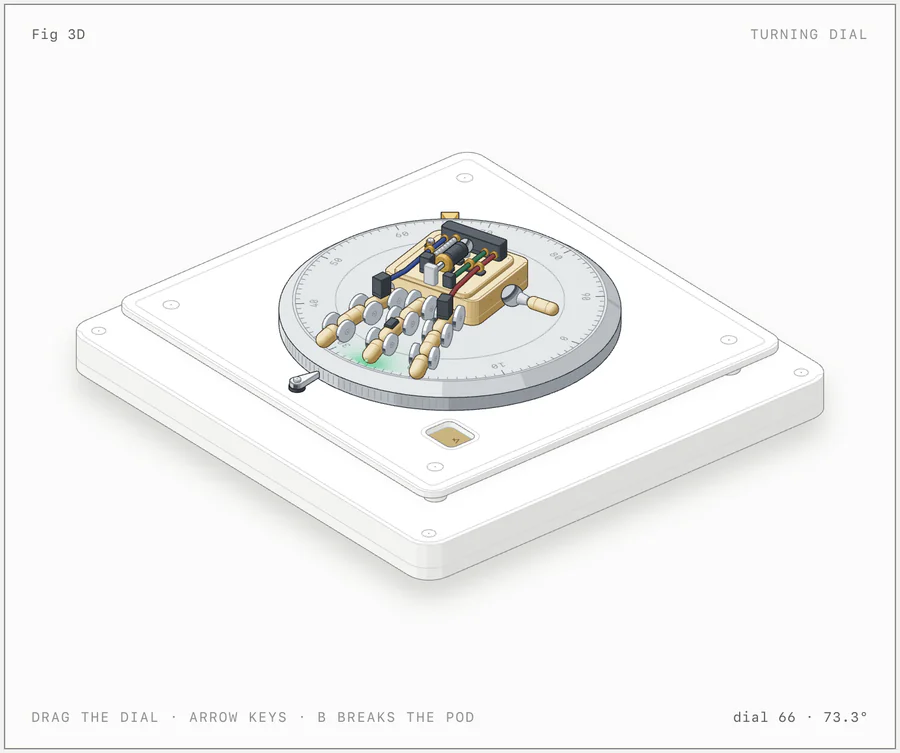
examples/turning-dial, the 3D mode (beta). About 90 metal-material parts are re-projected and re-shaded every frame as you drag the dial, with a second turn group, a hinge, a three-hinge finger that lifts, and a pod that breaks off as a free body. A WebGL LED, its light pool and its sparks follow the moving parts. stress.mjs beside it is a dense hand of about 380 parts, used to measure performance.Performance and maturity are reported honestly. A small 3D figure runs at 60 fps; the 380-part stress hand measured about 20 fps at 1440 px wide and 13-15 fps on a phone profile (390 px with 4x CPU throttle) on a heavily loaded machine. The mode is proved on its own example and one test figure, not yet on a production figure, so the rule is to turn one subject at a time and keep the clutter around it static. A full orbit audit budgets 30-40 s per part, which is 15-20 minutes for 30 parts; iterate with --quick --only=…, run the full audit in the background, and only a full run's turn audit passed counts.
Eight examples, from 300 lines to 380 parts
Eight complete examples ship with the skill, and the built HTML pages are committed to the repository, so any of them can be opened and tried. The documentation names its own benchmarks: test-rig is the quality bar for the drawing, raptor-engine is the bar for shader work.
| Example | Scale | What it demonstrates |
|---|---|---|
dial-indicator | about 300 lines (a 275-line build script, an 866-line page) | The smallest example: a dial gauge on a stand over a carriage of gauge blocks; hover slides the carriage and the needle reads each block |
desk-computer | about 85 solids, 850 paths | A 1984-style desk computer with a keyboard you can type on. The typed line appears on a CRT drawn in the plane of the case front, and switching it off collapses the picture to a line and a dot |
arcade-cabinet | about 240 solids, 15 cables | An upright cabinet with its side panel off. A dropped quarter rolls down the coin chute at the speed a rolling disc reaches on a 30° slope, trips the coin-switch wire and drops into the cash box; the switch's pulse runs chunk by chunk along its cable to the board; the CRT warms up, self-tests and runs an attract mode; the stick closes a microswitch under the panel. It shows how to place a camera so a cutaway's mechanism stays in view, how a concave board is drawn as a prism along any axis, and how moving parts are rebuilt in the page from the same module the build uses |
raptor-engine | 11 assemblies, a build of a few minutes | All round parts from lathe.mjs, all pipes and harnesses from tube.mjs; the reference for dense pipework, smooth shading, fades and the audit |
ripple-tank | two WebGL layers, 44° elevation | Registering shaders to isometric planes and driving them from a pure model |
test-rig | 53 solids, about 470 paths | A production figure from a real React/Next site: a glass button on a spring-mounted carriage, a finger probe on a rail that presses and pulls, and a dial gauge reading the lean |
spot-plate | six pairs of glass drops | A second production figure from the same site: each pair is drawn from one distance field, so a pair closer than merge runs together into one piece of glass, with a fan of feeler blades setting merge one blade per gap. The reference for shapes that morph into each other and for one control driving many parts |
turning-dial | about 90 live parts (380 in the stress build) | The 3D mode itself |
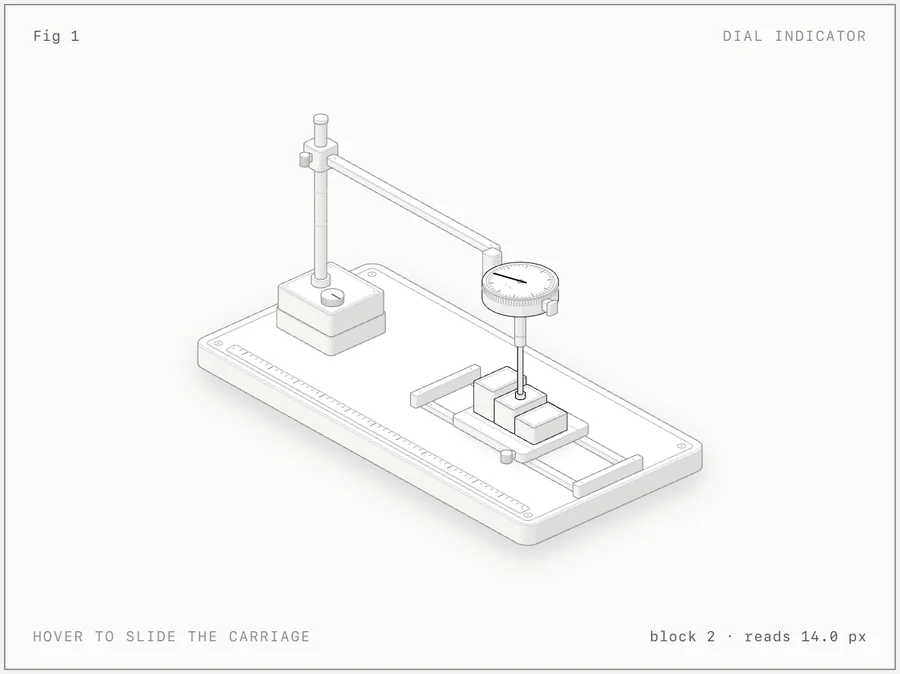
examples/dial-indicator: the smallest runnable sample of the whole system at about 300 lines. Its build.mjs is the fastest way to understand how the kit is used.Eight long-form guides live in references/ and are opened as needed: craft.md (the look in depth, a parts vocabulary with code, tone tables, painter's order patterns, round parts, pipes and harnesses, exploded views, screens on faces, and the anti-patterns that got figures rejected), kit.md (the API with signatures and examples), motion.md (loops, springs, tours, pointer, keyboard, accessibility, reduced motion, plus envelopes for one-shot events, exploded views, depth re-sorting and arming), react.md (the server/client split and the large-payload key-warning trap), verify.md (capture and drive commands, the review checklist, common faults), webgl.md, walkthrough.md (how the test rig was designed, step by step) and 3d.md. evals/evals.json holds test prompts together with what a good answer contains.
CI and house rules: kit changes must leave every example byte-identical
CI runs on macos-latest with Node 22 and does two things. It installs react@19.3.0, react-dom@19.3.0, typescript@5.9.3 and esbuild@0.28.2 into a temporary directory, points NODE_PATH at it and runs node --test scripts/*.test.mjs, so the repository itself stays dependency-free and the test tooling never enters a package.json. Then it rebuilds every example in both themes and requires git diff --exit-code, meaning the committed pages must be byte-identical to a fresh build. That is more effective than any style guide: any kit change that moves one byte of an existing figure turns CI red immediately.
The house rules in CONTRIBUTING.md are worth listing separately because most of them are decidable:
| House rule | What it means |
|---|---|
| No comments in code | Not a header, not a note beside a tricky line, not a JSDoc. The explanation goes into names and structure. Tool directives such as "use client" are not comments and stay |
| Kit changes are opt-in | A change to kit/ or scripts/inline-kit.mjs adds an option or a function whose default is the old behaviour; every existing example must rebuild byte-identical; if a change is meant to alter a figure, say so in the PR and commit the rebuilt pages with it |
| Both themes work, and light ships | Every colour is a token with a light value and a dark override, never a literal in a figure's CSS or shader. Light shaders are designed for paper (normal premultiplied alpha, never screen), not dark glows darkened |
| No overlaps | No pipe or cable passes through anything at rest, apart or in any frame of a motion; every crossing is drawn in true depth order, proved by the audit and never tuned by eye; interlocks are fixed in geometry; a stand-in shape is a bug |
| Lines resolve and textures fade | Every line ends on something. A rib row, bolt circle, seam or rule line ends on a real edge or fades out, never stops mid-surface. Curved surfaces shade smoothly, with no tone staircase |
| Shaders never pop | Every uniform rides an envelope with an attack and a decay, a phase change is a crossfade, every term reaches zero before any bound or canvas edge, the effect lives in world space in the figure's own camera, and the SVG still reads without WebGL |
| Every number is true | The readout, the motion and the caption come from one model with the real numbers. Docs follow the same rule: never write a number or a feature you have not checked |
| Read every PNG | Look at 4x close-ups of every joint in both themes before asking for a review |
Our assessment and its limits
The strengths are clear. It translates aesthetics into executable checks: 1.5 radii of clearance, bevels of 0.4-1.6, screw dots of 0.4-0.55, the figure filling 55-65% of the card, a device ratio cap of 1.5, a bend bound of R ≥ 2r / sin²(e − θmax). These are numbers that can go into code, not adjectives. It ships its own falsification tooling: twelve geometry checks, line ends: 0, and per-frame ink measurement, so a model cannot coast on "looks fine". The byte-identical rebuild in CI turns kit compatibility into a machine guarantee. Zero dependencies means no supply-chain surface and nothing to install. And putting "size the request, quote an estimate, do not start an Epic, report when a step overruns" into step one is rare governance of time and expectations for a skill of this kind.
The limits deserve the same clarity. First, it is not a chart library: there are no axes, series or data plots, and numbers appear only as a live readout driven by a model and as the true sizes and counts of parts. Dashboards and statistics need a different tool. Second, it draws machines, instruments, tools and furniture, not people and not exact maps; an idea with no mechanism to build comes out weaker. Third, it is slow on purpose: a figure takes a long session for the parts list, the geometry, the audit and close-ups of every joint in both themes, the Raptor build takes a few minutes, and a full 3D orbit audit takes 15-20 minutes for 30 parts. Fourth, the 3D mode self-reports as beta, proved only on its example and one test figure, dropping to roughly 20 fps in dense scenes. Fifth, the checks depend on a local Chrome or Chromium (CHROME_PATH for anything unusual) and Codex's sandbox may block them; the README gives three routes, approving per command, configuring approval_policy = "on-request" with sandbox_mode = "workspace-write" (network_access = true and writable_roots = ["/tmp"]) in ~/.codex/config.toml, or running the check yourself in a normal terminal. Sixth, the skills CLI copies the whole repository including examples (about 10 MB), and CLI 1.7.1 itself asks for Node 22.20 or later even though the skill only needs 20.10+ (on Node 20 the browser scripts restart themselves with --experimental-websocket, and the examples were rebuilt byte for byte on Node 20.19 and 22.11).
In one line: if your docs, blog or landing page needs an explanatory figure that a reader instantly recognises as a real machine and that still rewards a 4x zoom, and you are willing to spend a long session on it, this is the figure-producing skill whose craft standards read most like an engineering specification. If you want charts, human illustration, or a decorative image in ten seconds, it is designed not to do that.
Install
# Claude Code (installs to ~/.claude/skills/anatomy)
npx skills add wheresryan22/anatomy -g -a claude-code

# OpenCode (~/.config/opencode/skills/anatomy) / Codex (~/.agents/skills/anatomy)
npx skills add wheresryan22/anatomy -g -a opencode
npx skills add wheresryan22/anatomy -g -a codex

# Project-local install: drop the -g
npx skills add wheresryan22/anatomy

# Or with git
git clone https://github.com/wheresryan22/anatomy.git ~/.agents/skills/anatomy
Once installed, invoke it as /anatomy in Claude Code and OpenCode, or $anatomy in Codex (listed under /skills). If the skills folder did not exist when the session started, run /reload-skills in Claude Code; restart OpenCode or Codex. You do not have to name the skill either: asking for an isometric illustration, an explanatory figure for docs, a blog post or a landing page, or a "Linear-style" premium technical drawing loads it on its own.
Three prompting habits from the README get the best figures. Name the idea, not the drawing: say what it should explain and give the real numbers (sizes, counts, rates, thresholds), because inventing the object is most of the work and the skill does it better than a description of boxes and arrows. Or name the object: if you already know the machine you want (an espresso machine, a Bunsen burner, a lock), say so and say what should move. Say where it will live: a standalone HTML page, a lone SVG file, or a React/Next component, in light or dark, since the build differs for each.