How to Build Your Own Game in Unity with Claude Opus 5.5: The Full Course
From an empty folder to a small game you can play, test and build: connect Opus 5.5 to the Unity Editor, pass six gates from greybox level to models and sound, and prove it runs with Unity's Play mode verification loop and PlayMode tests.
From an empty folder to a small game you can play, test and build: connect Opus 5.5 to the Unity Editor, make a level and its rules, add enemies, bring in your own models and sound, and prove it all works. This is the full route, at a scale you can finish in a few evenings.
Two projects made the case for Opus 5.5 in Unity this autumn. One creator built a neon cyberpunk shooter, starring himself, with four enemy types, a three-phase boss and a new layout on every run, without opening a code editor. Another left Opus 5.5 running for 36 hours on a gaming laptop and came back to an old-school MMO with six playable races, four locations and a city full of townspeople.
Both are real, and both had help that's easy to miss: hours of preparation, other AI tools for models and sound, and a person watching and correcting. This course shows the whole route at a scale you can finish in a few evenings. It covers the connection, the habits that keep a project safe, five builds that add up to a playable slice, the asset pipeline, and how to test the result properly. Unity's own tools make that last part unusually strong.
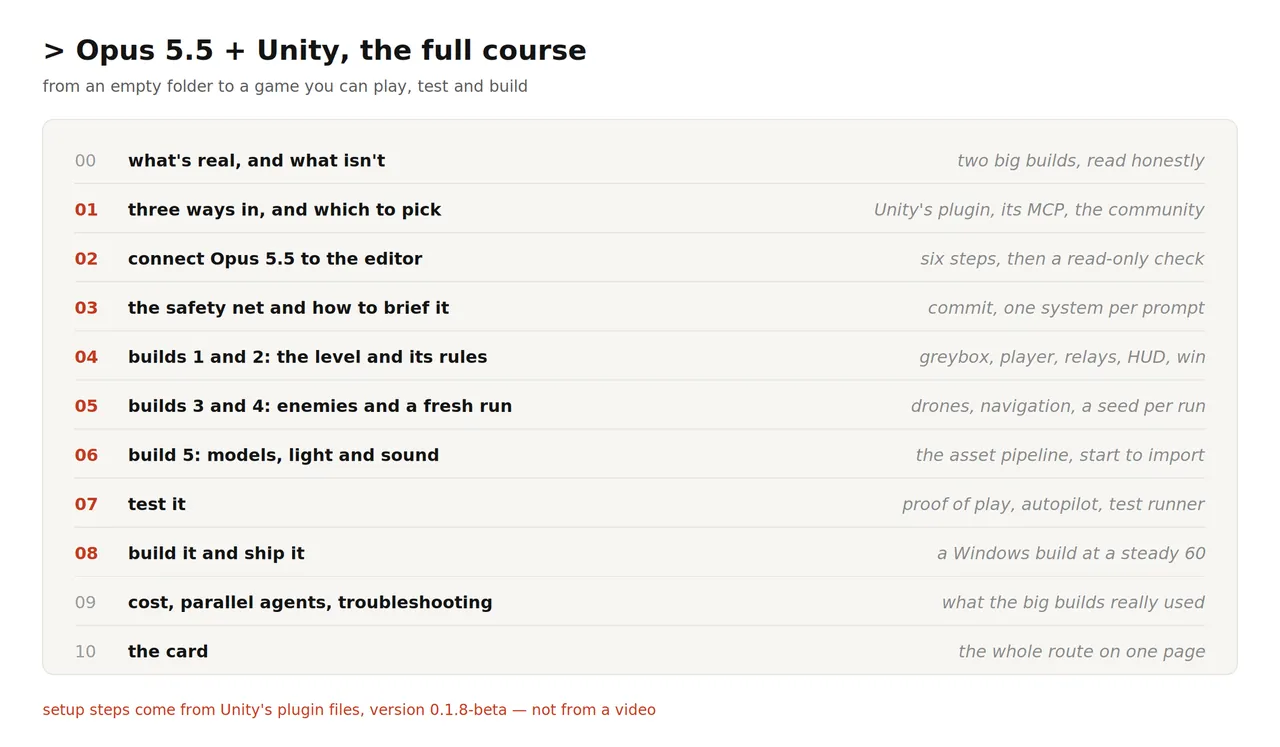
What's real, and what isn't
Read the two big builds closely before you start. Both are worth copying, but not in the way the thumbnails suggest.
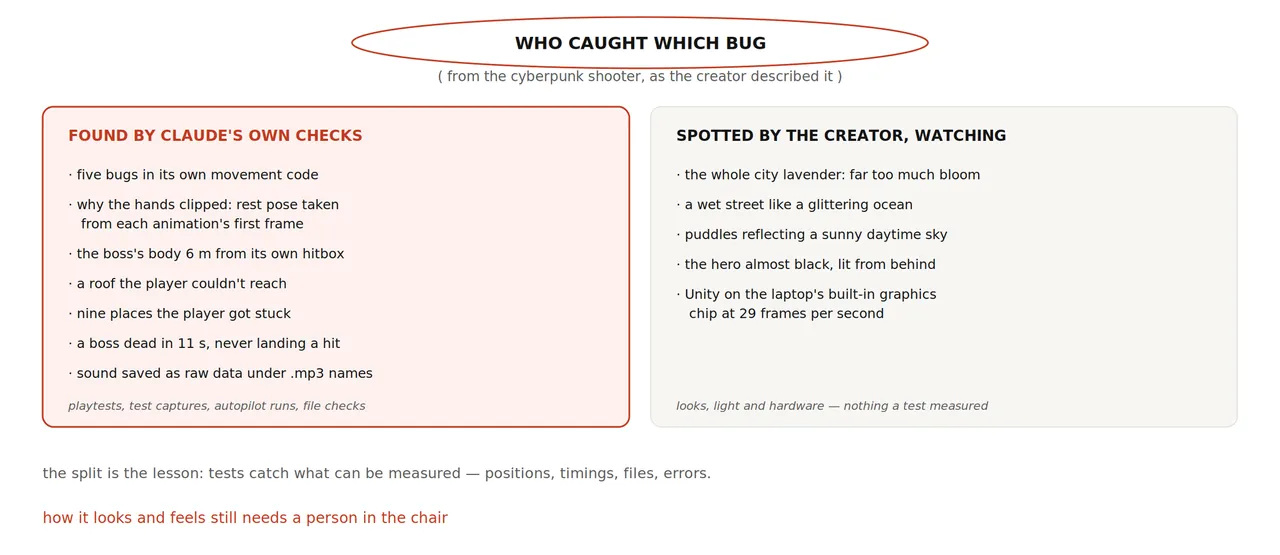
- The cyberpunk shooter. Opus 5.5 planned the game, then worked through four connected tools: Meshy for 3D models, Blender for the city, ElevenLabs for sound, and Unity for the game. It wrote its own playtest and an autopilot that played four full runs. It also lit the whole city lavender, made a wet street look like a glittering ocean, and confused its own animation data until the hero's hands passed through his body. The creator guided it step by step. In his words, it wasn't one magic prompt.
- The 36-hour MMO. Before starting, the creator spent hours researching, generated hundreds of reference images and picked the best, wrote one very large brief, and packed in his own proven methods as skills. Then Opus 5.5 ran about ten agents at once, greyboxing, playing and refining. The result is impressive and openly unfinished: awkward animations, items held wrongly, a broken bridge, a bad collider. It used a full weekly usage limit.
The lesson is the same as in Unreal. Opus 5.5 executes clear instructions quickly and can check a lot of its own work. Whether the game looks right, feels right and is fun is still your job, and the better your brief, the better everything downstream.
Three ways in, and which to pick
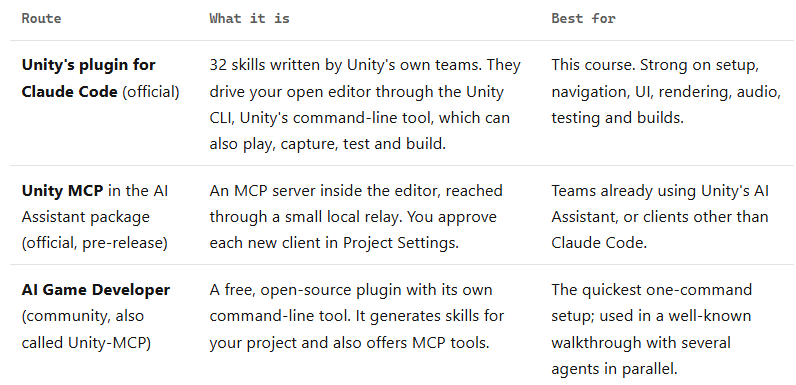
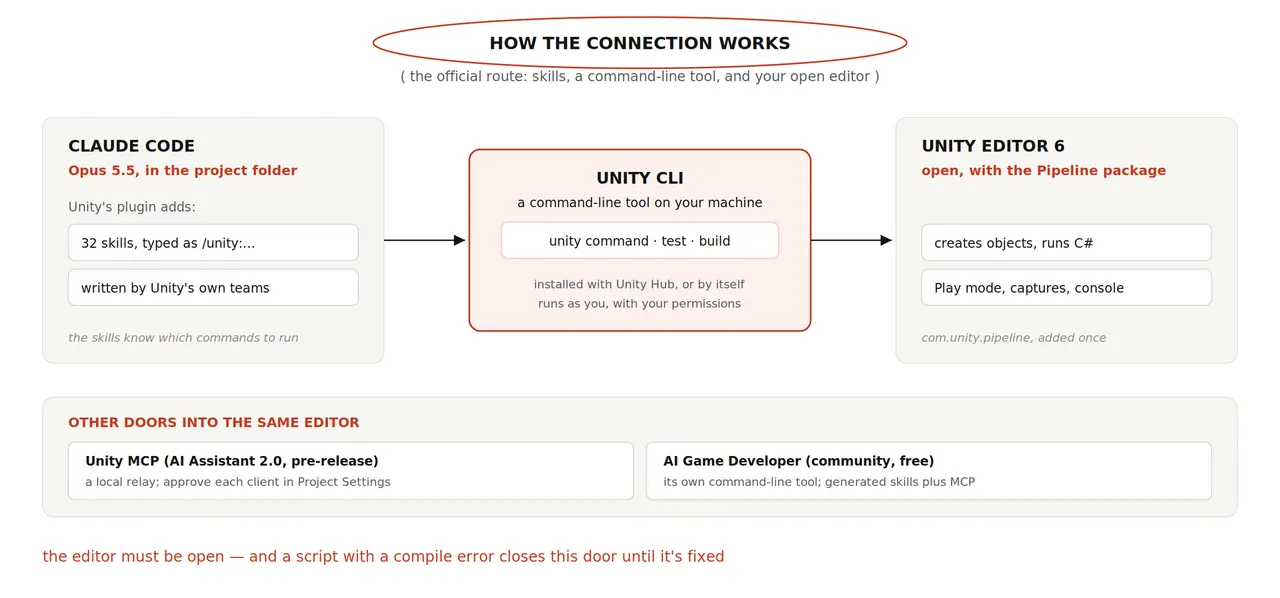
Unity offers more than one way to connect, which confuses newcomers. Here they are side by side. The two big builds above used the MCP route. This course uses Unity's official plugin because its files can be read and checked, it comes from the people who make the engine, and it includes a proper way to prove a game is actually running.
What you need
- Unity 6 or later, installed through Unity Hub. Hub now installs the Unity CLI for you.
- Claude Code with Opus 5.5. On paid plans it is the default model; check with
/model. - Unity's plugin for Claude Code. Free to install, published under the Unity Companion License, and listed both in Unity's own plugin catalogue and in Anthropic's official marketplace.
- Source control. Git with Git LFS for asset-heavy projects, or Unity Version Control. Not optional.
- Optional, for the look: a 3D model generator such as Meshy or Tripo, Blender, and a sound generator such as ElevenLabs. You can also start with free asset packs and add these later.
Connect Opus 5.5 to the editor
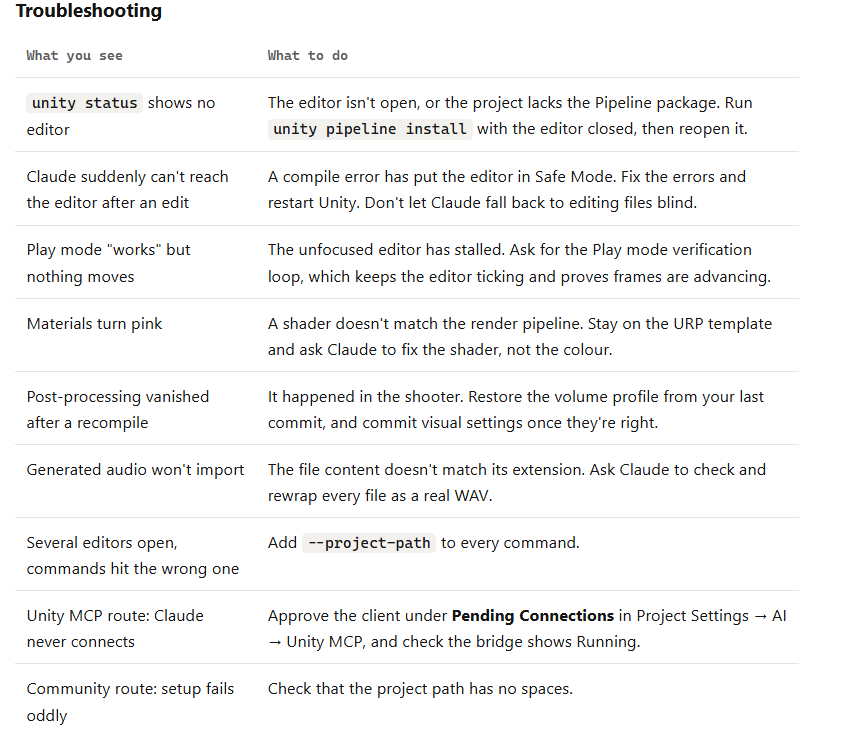
Step 1. Create the project. In Unity Hub, create a new project from the Universal 3D template. It uses URP, Unity's current default render pipeline. Unity's own skill notes that the old built-in pipeline templates are deprecated from Unity 6.5, and that mixing pipelines is what turns materials pink. Put the project under source control and make a first commit. If you'd rather let Claude do this, the plugin's /unity:new-unity-project skill walks through it; it asks about your game, platforms and source control before it creates anything.
Step 2. Install Unity's plugin in Claude Code. Inside a Claude Code session, run these two commands:
/plugin marketplace add Unity-Technologies/unity-agent-plugin
/plugin install unity@unity-agent-plugin
Type /unity: afterwards and the skills should appear in the list. If you prefer a terminal, unity setup claude runs the same two steps; the plugin loads the next time Claude Code starts, or after /reload-plugins.
Step 3. Check the Unity CLI. Open a terminal and run unity --version. If it isn't found, Unity documents a one-line installer: curl -fsSL https://unity.com/install.sh | bash on macOS and Linux, or irm https://unity.com/install.ps1 | iex in Windows PowerShell. Open a new terminal afterwards. You can also let Claude check and install it, since the skill is written to do that.
Step 4. Add the Pipeline package to the project. The CLI talks to the open editor through a small Unity package called com.unity.pipeline. Add it once, with the editor closed:
unity pipeline install --project-path /path/to/RelayRunStep 5. Open the editor and confirm it's reachable.
unity open /path/to/RelayRun
unity status
Wait until unity status reports the editor as ready. If you have more than one editor open, add --project-path to every command so the right one answers.
Step 6. Start Claude Code in the project folder and check. Start Claude Code in the folder that holds your Unity project, choose Opus 5.5, and send a prompt that only reads:
/unity:unity-cli Check that a Unity Editor is connected for this
project and report its state. Then, read only: name the open scene
and list its root GameObjects. Change nothing.
If the answer names real objects from your scene, you're connected.
The other two routes. Unity MCP in the AI Assistant package requires Unity 6 with the com.unity.ai.assistant package, currently version 2.0 in pre-release. Open Edit → Project Settings → AI → Unity MCP and check that the bridge shows Running. Under Integrations, choose your client and click Configure; Unity writes the connection entry for you. The first time Claude connects, the same settings page shows a Pending Connection; accept it. To test, ask Claude to read the Unity console and summarize any warnings or errors.
AI Game Developer (community). Its command-line tool is on npm. After installing it, the published walkthrough sets up a project with three commands: create the project, install the plugin, open it. In the editor, open Window → AI Game Developer and generate skills for Claude Code, then restart Claude Code so it sees them.
npm install -g unity-mcp-cli
unity-mcp-cli create-project ./RelayRun --unity 6000.3.1f1
unity-mcp-cli install-plugin ./RelayRun
unity-mcp-cli open ./RelayRun
Two things to know before choosing it: the project path can't contain spaces, and by default its sign-in links your agent to a hosted endpoint on the project's website. A local-only mode exists, so check which one you're using if privacy matters to you.
The safety net
Unity's plugin is clear about this: the skills change your project directly. They edit scripts, scenes and assets and can run C# inside your open editor, and not every change is logged or can be undone. Commit before every larger request.
- Commit at every step that works. A bad batch then costs you seconds, not an evening.
- Keep approvals on while you learn. The community walkthrough turned permission prompts off for speed and warned that this also lets Claude run anything, including commands slipped into content it reads. Only do that on a throwaway project.
- Fix compile errors before anything else. When a project has C# compile errors, Unity starts in Safe Mode, and the Pipeline package doesn't load. Claude then can't reach the editor at all.
- Treat Blender's MCP server with care. Blender's own page says it runs model-generated code with no guards, and recommends a virtual machine or a computer without sensitive data.
How to brief Opus 5.5 for Unity work
Start on medium effort, the default, and raise it with /effort high only for a problem it keeps getting wrong. Then follow the same six habits that work in any engine:
- One system per prompt. The level, or the HUD, or one enemy type.
- A finish line. "Done means I can hack three relays and walk out the door."
- A "don't change" list. Protect what you've already accepted.
- A report. Every script, prefab and scene it created or changed.
- No silent workarounds. If a tool is missing or a step fails, it should stop and say so.
- Proof, not a claim. Ask it to compile, enter Play mode, capture the game view and read the console before it reports success.
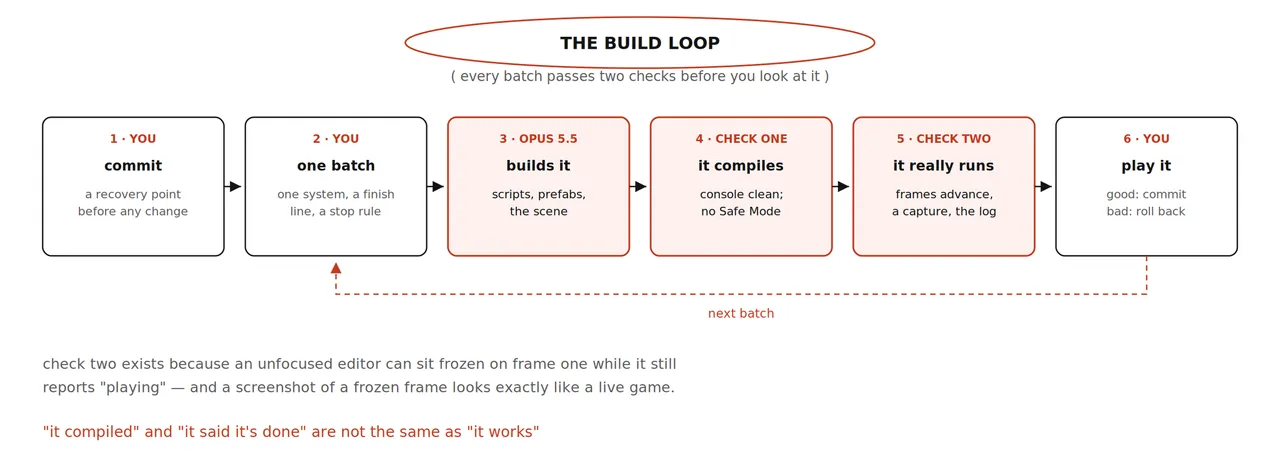
Two Unity-specific habits matter too. Ask Claude to work through the connected editor rather than editing scene files by hand; Unity's skill prefers that, and hand-edited scene files break in subtle ways. And keep conversations short: the community walkthrough found quality dropping once the context window was about half full, so it ran /clear between tasks and kept each agent on one job.
The route: one small game, six gates
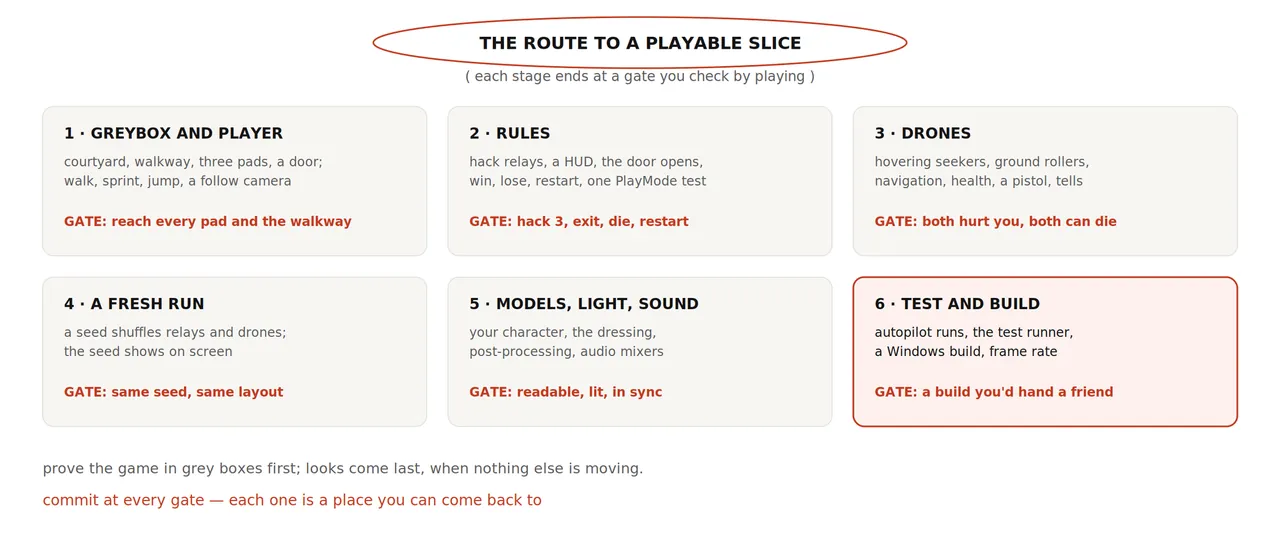
The running example borrows its idea from the cyberpunk shooter but stays small enough to finish: a third-person courtyard where you hack three relays while drones hunt you, then reach the exit door. You can win, die and restart, and every run shuffles where things appear. Each stage ends at a gate you check by playing, and you commit at every gate.
Build 1: a greybox level and a player
Player controls are the one system worth giving a head start. In Puget Systems' Unreal test, a vague request to change player movement left the game unplayable and a repair didn't fix it. In Unity, the simplest head start is Unity's free Starter Assets – Third Person controller from the Asset Store: import it, commit, and ask Claude to build around it. If you'd rather Claude write movement itself, keep the request precise, as below.
/unity:unity-cli Build a greybox level in a new scene called Courtyard.

Layout: a square courtyard about 40 by 40 metres, a raised walkway
along one side reached by stairs, three relay pads spread around,
and an exit door in the far wall. 1 unit = 1 metre.
Use primitives and plain URP materials only. No final art.

Add a third-person player who can walk, sprint and jump, with a
camera that follows over the shoulder. Use the Input System.

Done means: I press Play and can reach all three pads, the door
and the walkway.
Work through the connected Editor, not by hand-editing scene files.
When it compiles: enter Play mode, confirm frames are advancing,
capture the game view and read the console for errors.
Report every script, prefab and scene you created.
If something fails, stop and tell me. Don't work around it.
Gate: play it yourself. Walk to every pad, climb to the walkway, try to fall off the edges. Commit.
Build 2: the rules
Add the game rules. Don't move the level or change the player.

1. Standing on a relay pad for 5 seconds hacks it. Show a progress
   ring while it uploads; stepping off pauses it.
2. A HUD showing "Relays 0/3" and the player's health.
3. The exit door opens after all three relays. Walking through it
   shows "Run complete".
4. At zero health show "Run terminated". R restarts the scene.

Build the HUD with UI Toolkit.
Done means: hack 3, exit, win; take damage, die, restart.
Then write one PlayMode test that hacks all three relays and checks
the door opens. Run it and show me the result.
The plugin has a skill for each UI framework, and /unity:ui picks the right one. Asking for a test this early is deliberate: a test that checks the core loop pays for itself every time a later batch quietly breaks it.
Gate: run the loop yourself, then try to break it: step on and off a pad, hack two and try the door, press R mid-hack. Commit.
Build 3: drones
The cyberpunk shooter added four enemy types and a boss in one prompt, after a lot of groundwork. Start with two, and give each a tell: a visible or audible warning before it attacks. In that game, the rooftop snipers' lasers blink just before they fire, which is the player's cue to roll. Tells are what make enemies feel fair.
Add two kinds of drone. Don't change the relays or the HUD.

Seekers hover, patrol between points, and fire slow orbs at the
player once they see them. Rollers chase the player on the ground,
beep faster as they close in, and explode next to the player.
Set up AI Navigation for the rollers and tell me what you added.
Every drone has health. The player gets a plasma pistol on the left
mouse button that damages them.
Every attack needs a tell — a glow or a beep — before it lands.

Done means: both types find me, can hurt me, and can be destroyed.
Verify in Play mode, then report what you created.
For the navigation setup, the plugin's /unity:initialize-ai-navigation skill covers walkable surfaces, agents and obstacles. If shots pass through enemies or triggers don't fire, /unity:physics-3d-collision is the skill for diagnosing it.
Gate: fight both types until you've won and lost against each. Commit.
Build 4: a fresh run every time
What made the shooter replayable was a seed: a number that decides where everything spawns, so each run is different but any run can be repeated exactly. Repeatable runs are also what make bugs reproducible.
Make each run different. At the start of a run, pick a seed and use
it to choose where the relays and drones spawn, from spawn points
placed in the scene. Show the seed in a corner of the HUD, and add a
debug field where I can type a seed to replay it.
Don't change how relays or drones behave.
Done means: two new runs look different, and the same seed gives
the same layout twice.
Gate: start three runs, note one seed, replay it. Commit.
Build 5: models, light and sound
Now, with a game that works in grey boxes, spend on looks. The shooter's pipeline is a good template because it shows the handoffs, which is where things break.
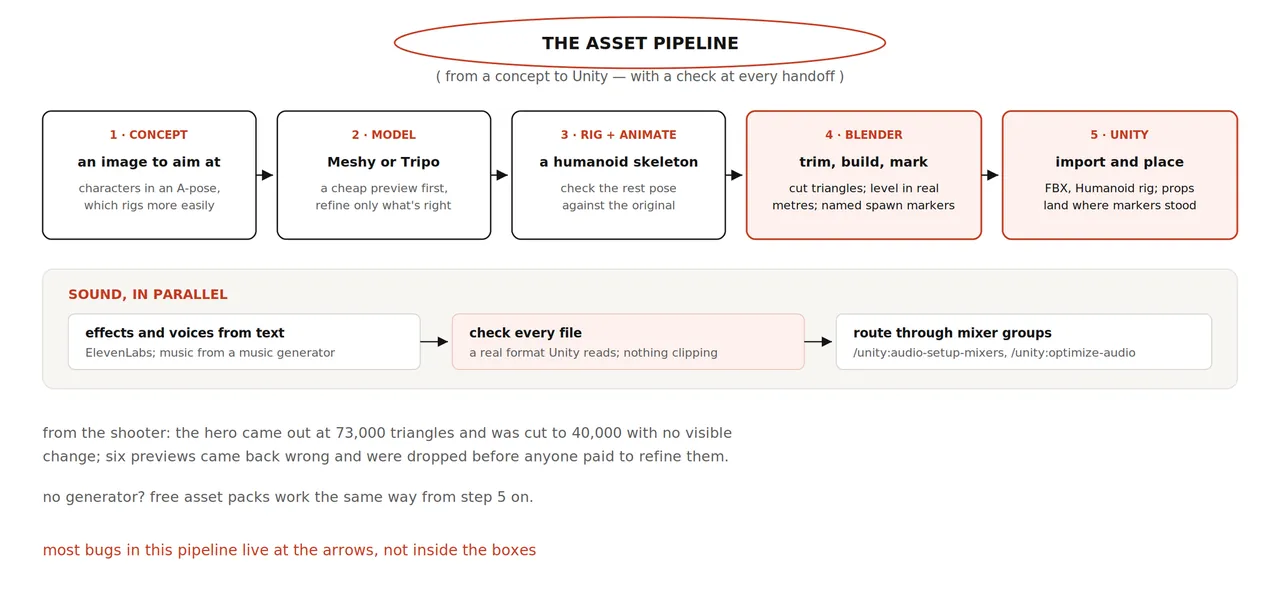
Your character. The shooter's creator gave Claude a photo of himself and asked for a full-body concept as a cyberpunk runner in an A-pose. Meshy turned that one image into a textured model in about four minutes, then rigged it and added animations. The prompt below follows that path; swap in Tripo if you prefer it, the checks are the same.
Turn concept.png into the player character.
Make a cheap preview first and show it to me before refining.
Keep the final model under 40,000 triangles.
Rig it as a humanoid with idle, walk, run, jump and shoot animations.
Import it into Unity with a Humanoid rig and swap it into the
existing player. Don't change movement, camera or controls.
If an animation looks wrong, compare its rest pose with the
original model before changing anything.
Report every asset you imported and changed.
That last instruction comes from a real bug. In the shooter, the hero's hands kept passing through his body. Claude measured every animation clip against Meshy's original and found the cause: it had used the first frame of each animation as the character's rest pose.
The level's look. The shooter's city was built in Blender in real metres, with invisible markers for spawn points, relays and props. When it was exported, every prop landed in Unity exactly where it stood in Blender. That's worth copying: ask for named empty markers in Blender and have Claude turn them into spawn points in Unity, which plugs straight into your seeded runs.
For lighting and effects, use /unity:urp-postprocessing and ask for before-and-after captures each time. Keep a short leash here. The shooter's lighting took five rounds after the whole city came out lavender from too much bloom. One later recompile also wiped all the post-processing without warning, so commit your visual settings once you like them.
Sound. The shooter used ElevenLabs for 77 sound effects and a robot announcer, all generated from text, plus a music generator for four tracks. One catch is worth knowing: the tool saved raw audio under .mp3 names that Unity couldn't read. Claude noticed, rewrapped every file as a proper WAV and fixed 15 that were clipping. Ask for that check every time you bring in generated audio, then route sounds with /unity:audio-setup-mixers, which reports anything it couldn't classify instead of skipping it.
Gate: the character animates cleanly, nothing decorative blocks a path or a shot, you can read the scene at a glance, and sounds play when they should. Commit.
Test it
Testing is where Unity's tools stand out, and where the shooter found most of its bugs. There are four layers, and each catches things the others can't.
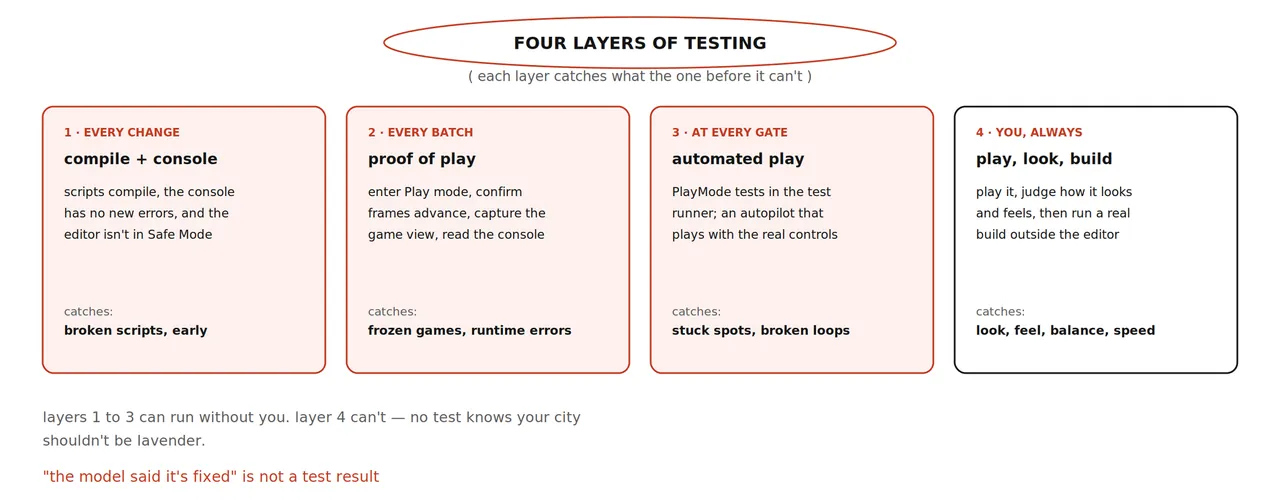
Layer 2: proof that the game is actually running. This one deserves its own explanation, because it fixes a trap you'll otherwise hit within the first hour. Unity slows the editor down when its window isn't in focus, which is exactly the situation when Claude is driving it while you do something else. Play mode can then sit frozen on its first frame while the editor still reports that it's playing, and a screenshot of that frozen frame looks just like a live game.
Unity's plugin includes a recipe for this. In short: keep the editor ticking while unfocused, enter Play mode, wait for the editor to report ready, prove the frame counter is moving, capture the game view, read the console for errors, and stop Play mode. You don't need to type any of it. Ask for it by name:
/unity:unity-cli Use your Play mode verification loop on the
Courtyard scene: confirm frames are advancing, play for 20 seconds,
capture the game view, and list every console error and warning.
Layer 3: an autopilot and real tests. The single most useful move in the shooter was asking Claude to play the game itself. It wrote an autopilot that used the player's real controls and played four full runs. Those runs found a roof the player couldn't reach, nine places where he got stuck, and a boss who died in eleven seconds without landing a hit. An earlier playtest it wrote found five bugs in its own movement code.
Ask for the list before any fixes, so you decide what matters:
Write a playtest autopilot that drives the player with the real
controls: visit every relay, hack it, fight whatever attacks, and
walk to the exit. Run it for five different seeds.
Report every place the player got stuck, anything it couldn't
reach, how long each run took, and every console error.
Don't fix anything yet. Give me the list first.
Alongside the autopilot, keep a few PlayMode tests for the core loop. Claude runs them through Unity's test runner with unity test --mode PlayMode, and the results are unambiguous: exit code 0 when everything passed, 8 when tests ran and failed, 6 when the run never produced a verdict, such as a compile error or a timeout.
How to report a bug. A useful report gives the seed, the steps, the expected result and the actual result, and asks for the cause before any change. The seed matters most: it lets Claude reproduce exactly what you saw.
Bug, seed 48213: after the second relay, Rollers stop chasing me.
Steps: start a run with seed 48213, hack two relays, walk toward a Roller.
Expected: it chases. Actual: it sits still; no console errors.
Reproduce it with the autopilot first and tell me the cause.
Then fix only that, and rerun the PlayMode tests.
If two attempts fail, stop. Roll back to your last commit and ask again in a smaller piece, or raise effort one level for that single task.
Build it and ship it
The editor isn't the game. A real build catches problems the editor hides, so make one as soon as the slice is playable, and play the build, not the editor.
Make a Windows build of RelayRun, run it, and report the frame
rate in the busiest spot. If it runs far above 60, cap it at 60.
List any errors in the player log.
The shooter's first build ran at 140 frames per second and pushed the laptop's graphics card to 81 °C, so it was capped at 60. Its creator also found Unity running on the laptop's built-in graphics chip instead of the gaming one, at 29 frames per second, and Windows kept ignoring the setting. If performance looks wrong on a laptop, check which graphics processor Unity is actually using before blaming the game.
Cost, parallel agents and troubleshooting
What the big builds used. Opus 5.5 costs $4 per million input tokens and $20 per million output tokens through the API, and on a subscription, long engine sessions draw down your usage limits quickly. The 36-hour MMO used about 7.85 billion tokens, nearly all of them re-reading cached context, worth about $2,200 at API prices, and one full weekly usage limit. On top of that came about 7,000 credits on Higgsfield, an asset-generation service, for 300 models and 600 images. The shooter's characters and props took a little over 900 Meshy credits.
Stay on medium effort and raise it only for a specific stubborn problem. Three habits keep the cost and the context down:
- Preview before refining. A cheap preview of every asset, and refine only the ones that are right.
- Keep context small. Run
/clearbetween tasks and turn off connectors you aren't using. Unity's skills load only when a task needs them. - Put a time box on experiments. Decide how long a task gets before you roll back and do it yourself.
Running several agents at once. The MMO ran about ten agents simultaneously, and the community walkthrough regularly ran two or three Claude Code sessions in the same project: one making materials, one building walls, one adjusting the camera. Each session is an independent agent with its own context. The rule that keeps this safe is to give each agent different files. A Unity scene is one file, so two agents editing the same scene or prefab at once can overwrite each other's work. Split work by system, scripts or separate scenes, and commit between rounds.
The card
The smallest useful version of all this is one evening: connect the editor, build the greybox courtyard, add the three relays and the exit, and play your own level from start to win. Everything after that is the same loop, repeated with more ambition. The whole route on one page:
- Install Unity 6 through Hub. Create a project from the Universal 3D template. Commit.
- In Claude Code:
/plugin marketplace add Unity-Technologies/unity-agent-plugin, then/plugin install unity@unity-agent-plugin. - Check
unity --version. Rununity pipeline install --project-path <project>with the editor closed. - Open the editor and wait for
unity statusto say ready. Start Claude Code in the project folder with Opus 5.5 on medium effort. Send a read-only prompt. - Build in order: greybox and player, rules, drones, a seeded run, models and sound. Commit at every gate.
- One system per prompt, with a finish line, a "don't change" list, a report, and no silent workarounds.
- After every batch: it compiles, it really runs (the Play mode loop), then you play it.
- Write PlayMode tests for the core loop early. Ask for an autopilot run before every gate, with the list before the fixes.
- Report bugs with the seed, steps, expected and actual. Two failed fixes means roll back.
- Make a real build early, play the build, and check the frame rate on the hardware you care about.
Source: "How to Build your own Game in Unity with Claude Opus 5.5 (Full Course)" by rewind (@rewind02) on X, published 2026-10-14.
Source:rewind (X)https://x.com/i/article/2109565585021390848