
Hands-On: Building a 3D Game with Opus 5.5, Astra and Tripo
A 16-day AI pipeline turned The Little Prince into an explorable 3D game: Image 2.5 art, Tripo assets, Opus 5.5 driving Blender and Unity, Astra iterating. ~3M views; prompts published.
This week I used Opus 5.5 + Tripo + Blender to turn the interstellar journey of The Little Prince into a 3D game you can explore yourself. From scene construction and character production to code development and debugging, the main production work was handed to AI. After release, the game accumulated close to 3 million views across the internet.
Many people loved the game and wanted to know how it was made. So I decided to publish the full production pipeline: with real cases and reusable reference prompts, this is a hands-on introduction to AI 3D game production, so you can start building the world you imagine too.
The article has three parts: the development pipeline and preparation, scene construction, and character construction.
1. Development Pipeline and Preparation
The whole game's development flow compresses into one pipeline: Fable 5.1 writes the PRD, sorting out the core scenes, characters and story line; Image 2.5 generates scene and character images; Tripo generates the core 3D assets; Opus 5.5 builds the core code; Astra handles iteration and bug fixing.
flowchart LR
  A["Fable 5.1
PRD: scenes / characters / story"] --> B["Image 2.5
scene & character images"]
  B --> C["Tripo
core 3D assets"]
  C --> D["Opus 5.5
modeling & core code"]
  D --> E["Astra
iteration & bug fixes"]
The tooling side has two parts:
- Blender: install the Blender CLI, used to clean up the 3D models coming out of Tripo and to do the game's overall 3D modeling; install the paid Auto-Rig Pro add-on for character rigging and skinning, which makes action work much easier.
- Unity: install the Unity App (unity.com) as the game engine that packages scenes, characters and interactions into a complete game; install the Unity CLI and add the Pipeline package to the project, so Claude can operate the Unity project directly through the official Unity MCP.
| Stage | Tool | Output |
|---|---|---|
| Requirements & story | Fable 5.1 | PRD: core scenes, characters, story line |
| Concept design | Image 2.5 | Scene reference sheets, character T-pose four-views |
| 3D assets | Tripo (H3.1 / Smart Mesh P2.0) | Prop and character models: quad topology, controlled polygon count, textured |
| Modeling & code | Opus 5.5 + Blender CLI + Unity MCP | Scene replication, retargeting, core game code |
| Iteration & fixes | Astra + independent review agent | Multi-camera blind review, bug fixes, polish |
The rest of this article focuses on the two most hands-on parts: scene construction and character production.
2. Scene Construction
In one line: Image 2.5 generates the scene image — split the 3D assets and generate them in Tripo — Opus 5.5 drives Blender + Unity to model the scene. The detailed steps follow.
(1) Generate scene reference images with GPT Image 2.5, turning ideas into explicit pictures
Following the game requirements sorted out earlier, use Image 2.5 to generate scene reference images that fix the overall art style, color palette and the positions of the main objects.
It helps to lock one satisfying hero shot first, then supplement it with other angles around it (especially for scenes with both interiors and exteriors). A top view mainly explains the layout; an oblique side view adds height, silhouette and layering. Or you can generate one overall board like this directly:
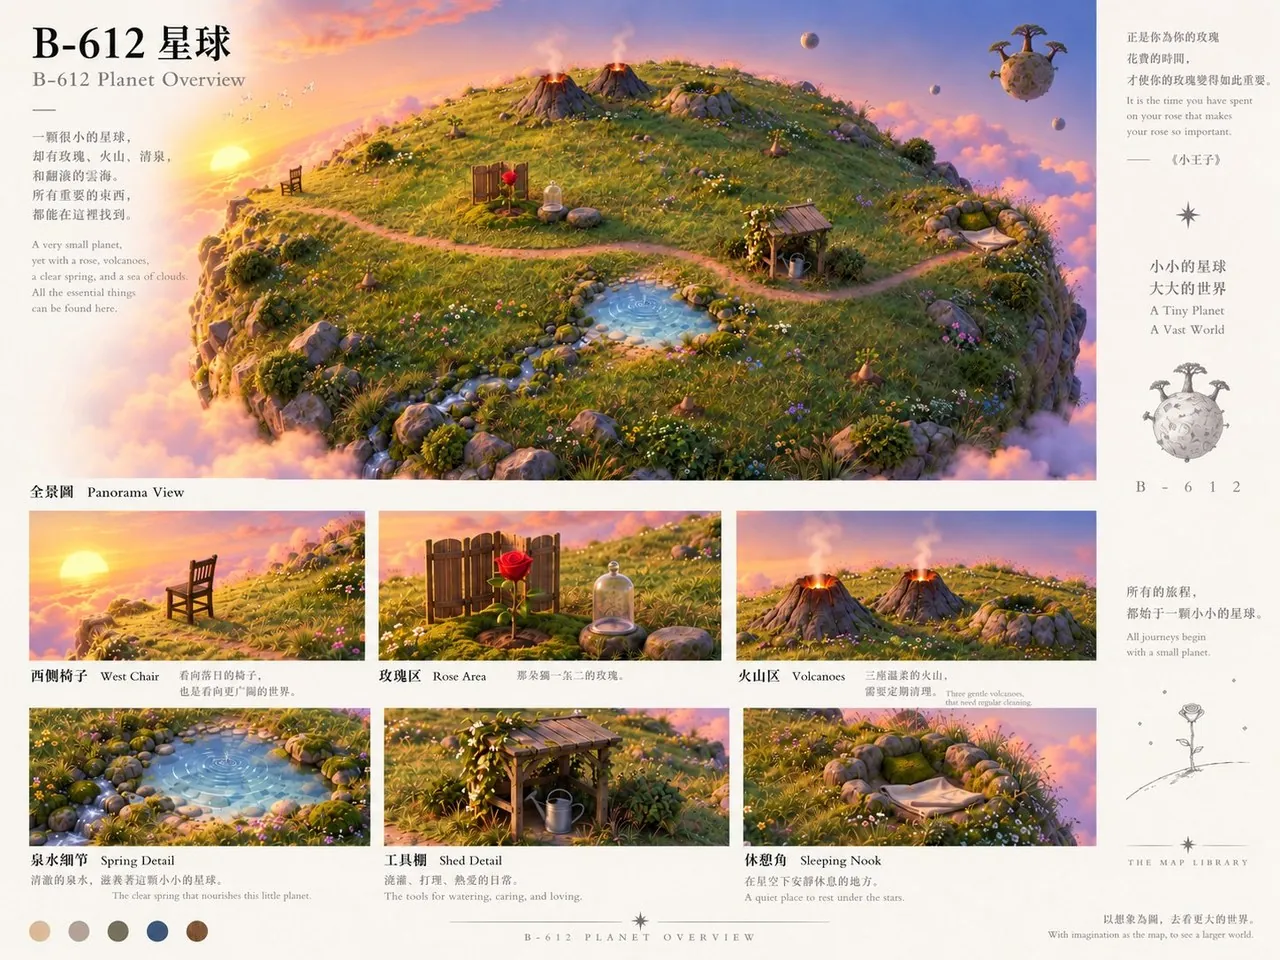
Reusable reference prompt:
Based on the uploaded scene reference image, generate one full-coverage reference picture of this scene, including multi-view views of the whole environment plus close-up details of local parts.
(2) Let AI split the scene assets and pick the models that need their own Tripo generation
With the reference image in hand, you can ask AI directly which assets in the scene should be generated individually in Tripo, and which can be left to Opus 5.5 to build in Blender/Unity.
I'm about to start game development; my tech stack is Tripo + Blender + Unity. Based on the scene reference image we generated above, analyze in depth which assets are suitable for Tripo generation and which are suitable for building directly in Blender. Mark the assets that need Tripo generation on the image so I can confirm.
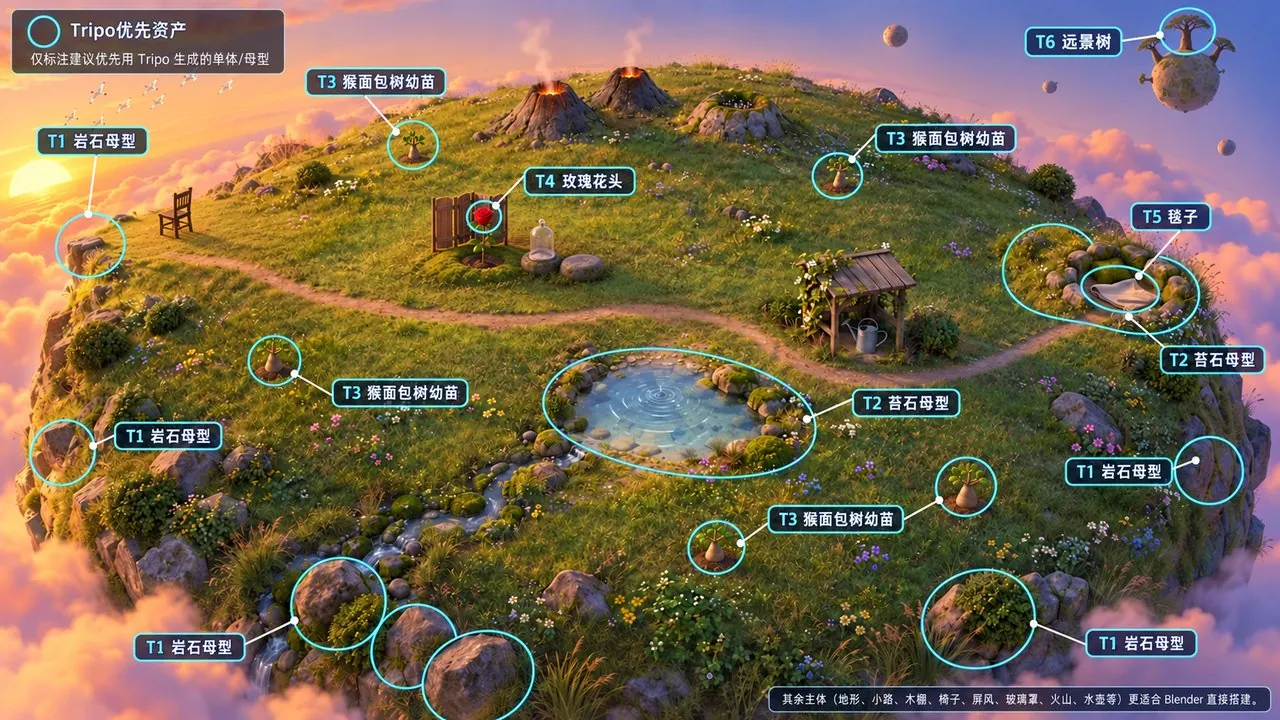
For scene-prop 3D assets inside Tripo, use the H3.1 model: it guarantees high-precision detail on the assets.
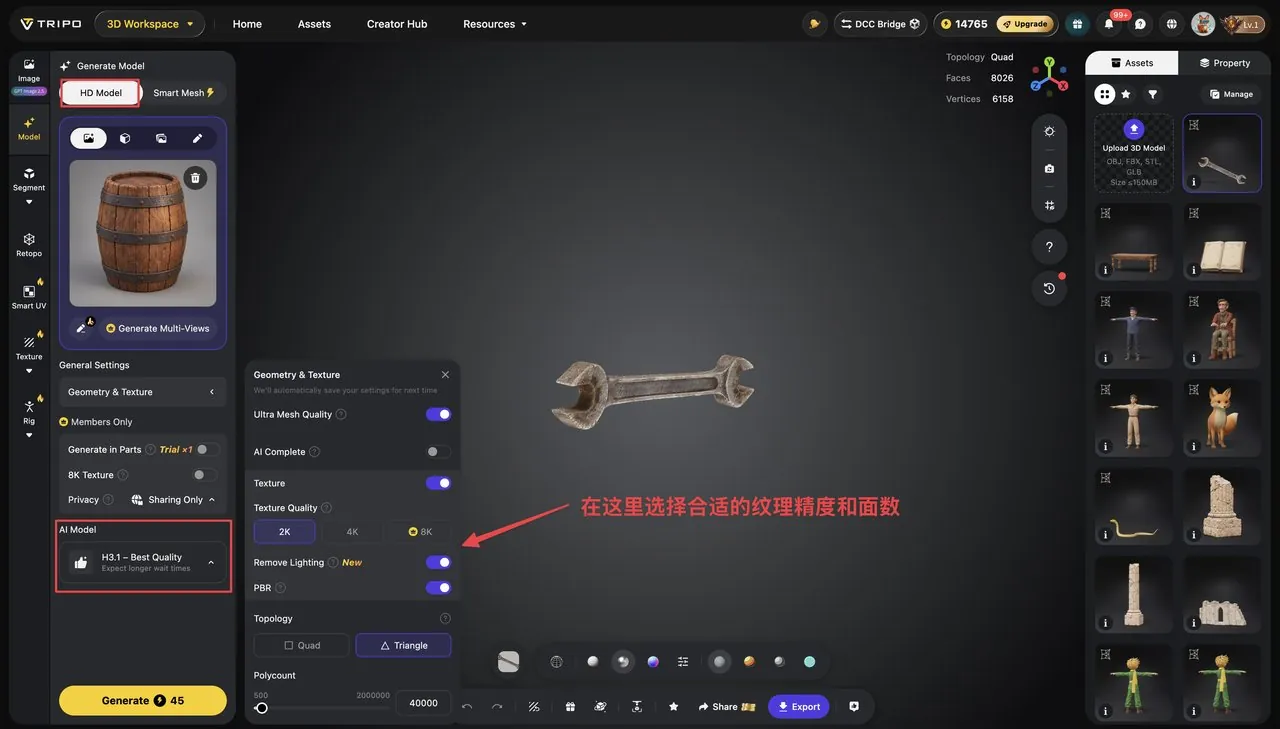
(3) Drive Blender and Unity with Opus 5.5 through a deliberate prompt: detailed references plus multi-camera iteration
After generating and exporting the props that need individual treatment in Tripo, hand those assets plus the step-one scene reference images to Opus 5.5, let it drive Blender + Unity to build the whole environment, and place props according to the references, adjusting scale and position.
Once done, inspect the scene from the front, the side and other angles, and use screenshot feedback to adjust layout and details step by step.
Based on the uploaded multi-view reference images of the scene's interior and exterior and the generated Tripo 3D assets, replicate the reference perfectly. Match the same striking material quality and detail. After the implementation is done, dispatch an independent review agent to blind-review the scene from multiple camera positions. Wherever it finds differences from the reference, keep iterating until they are gone.
3. Character Modeling
The character line is likewise a five-step pipeline: Image 2.5 generates character images — generate the character 3D model in Tripo — rig and skin with Blender's Auto-Rig Pro add-on — plug in mixamo motions — secondary adjustment in Blender for complex interactions (optional). Here we walk through the Little Prince himself.
(1) Generate multi-view character references with Image 2.5
From the character design and setting, first use Image 2.5 to generate the Little Prince's T-pose four-view, making sure the details stay consistent across all views.
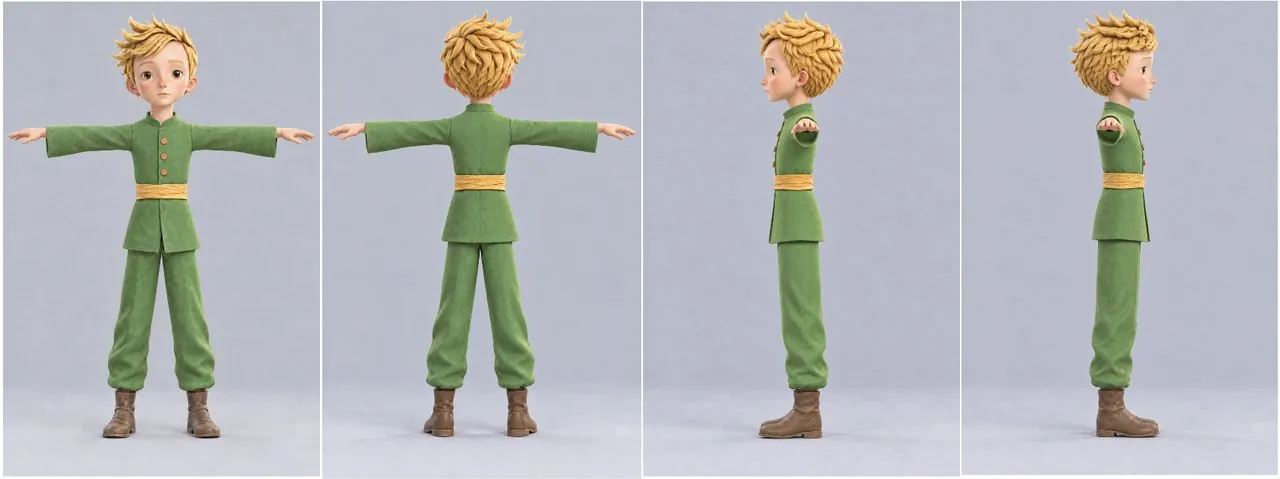
(2) Generate the 3D character asset with Tripo's Smart Mesh P2.0
Smart Mesh P2.0 is a 3D generation model built specifically for games and interactive content: it produces character structures with controllable polygon counts that stay easy to edit, which pays off later in rigging and animation.
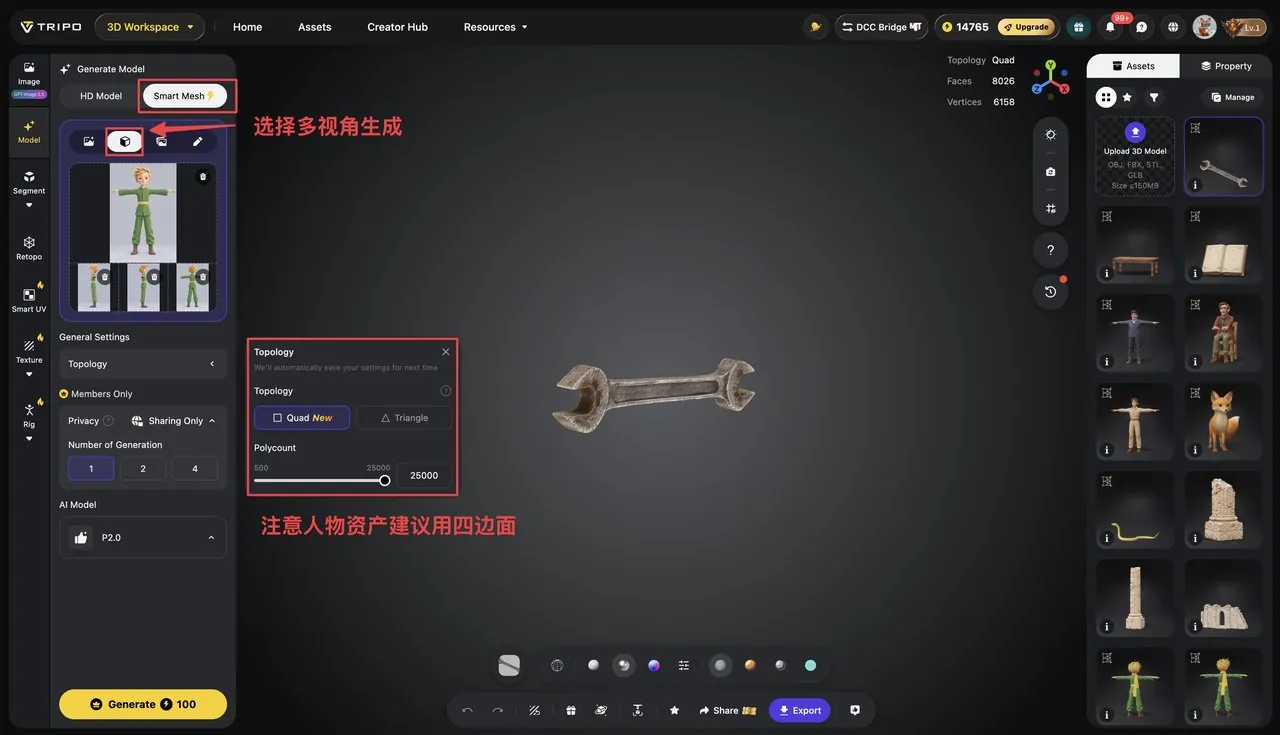
In Tripo, choose "multi-view to 3D", upload the four views in order, leave the topology at quad, push precision to the maximum, select the P2.0 model and generate.
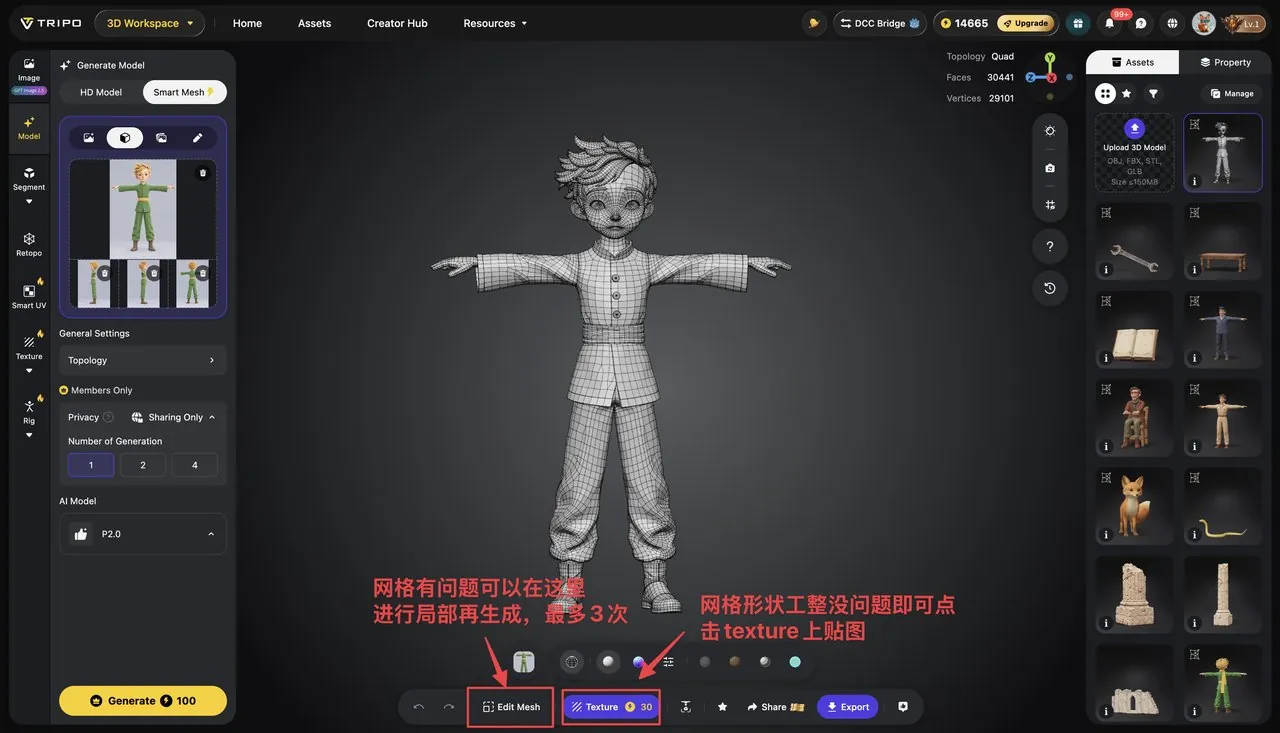
Afterwards, if the first white-model mesh comes out clean and orderly, click "Texture" to generate the model's textures; if the mesh shape is off, choose "edit mesh" to regenerate locally.
(3) Auto-rig and skin the character in Blender with the Auto-Rig Pro add-on
With the add-on configured, upload the character model in Claude and feed it this prompt, distilled from repeated debugging, for efficient rigging and skinning:
Use Auto-Rig Pro to rig and skin the character, making sure bone positions align with the character's joints. When done, test basic motions such as raising an arm, bending a leg and turning around, and check and fix obvious deformation, stretching and clipping.
(4) Download the needed motions from mixamo and let Opus 5.5 retarget them to the character's skeleton
Following the game design, search mixamo (mixamo.com) by keyword for the motions the Little Prince needs, and download the corresponding FBX motion files.
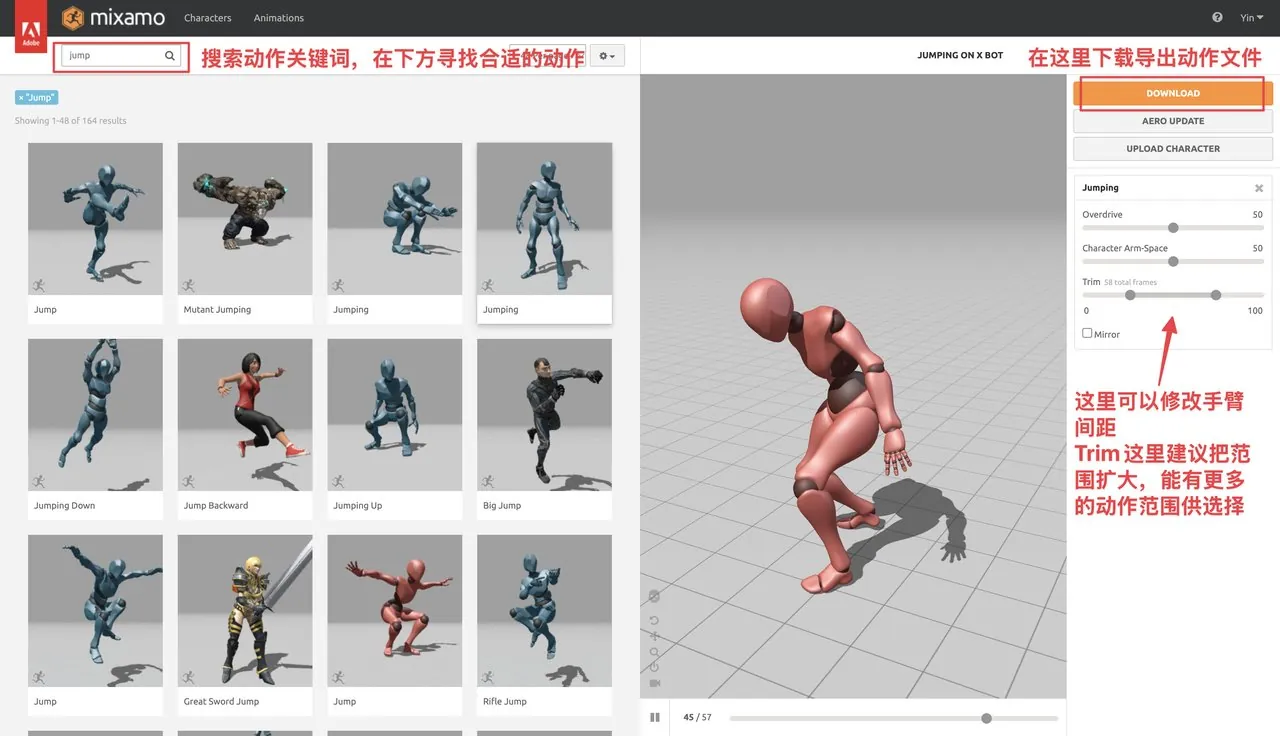
Then let Opus check whether each motion matches the Little Prince's actual skeleton, and complete the retargeting.
(5) Adjust special motions and contact details in Blender (needed for complex interactions)
For complex interactions where the character touches props — "the Little Prince lifting the watering can" — mixamo rarely has a perfectly fitting motion. Pick the closest base motion first, then let Opus 5.5 iterate on the details in Blender repeatedly.
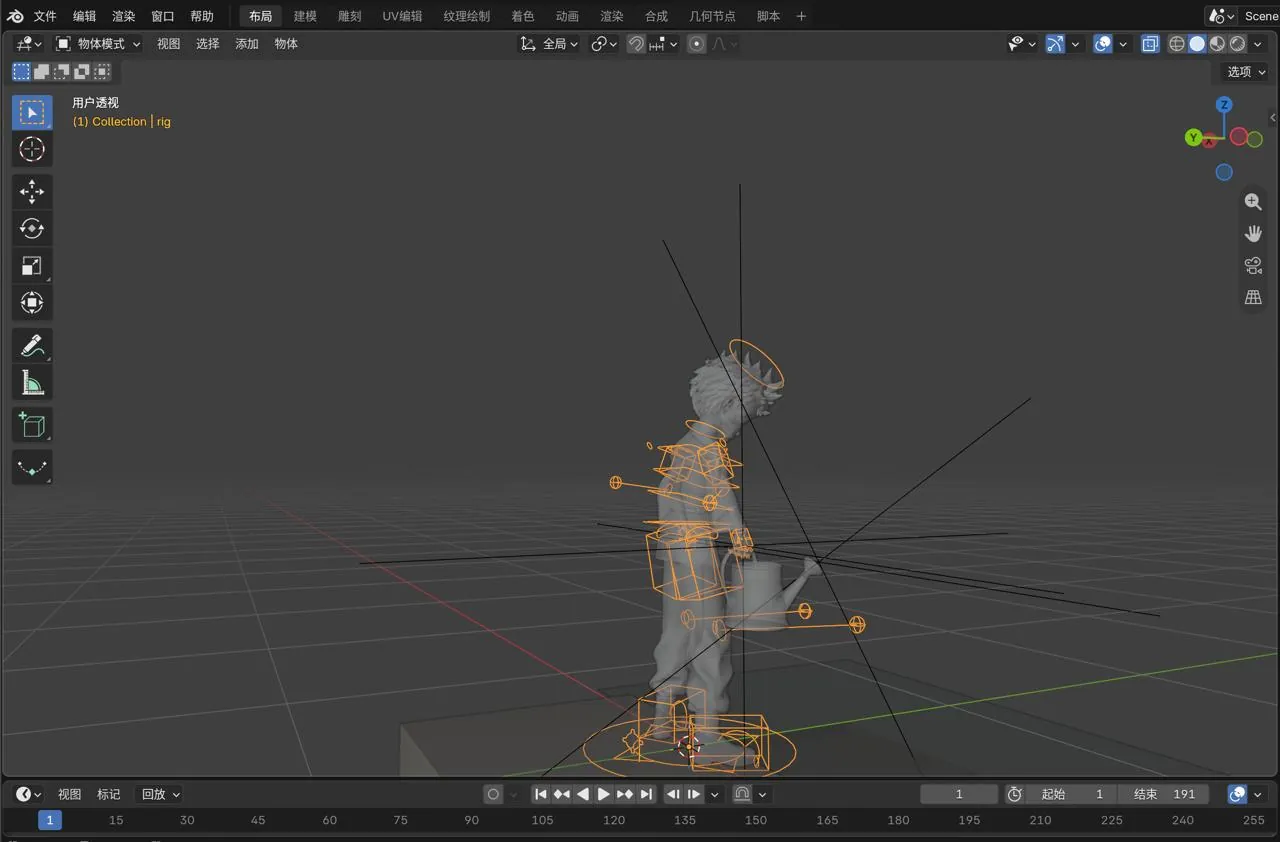
Refer to the provided Mixamo motion, keep the parts that apply, and use Auto-Rig Pro's arm IK controllers to adjust the arm pose; together with detail fixes for finger grip and kettle position, complete the kettle-lifting motion. Make sure the palm stays in stable contact with the handle and the lift looks natural — no clipping, no grip slip, no floating kettle.
Closing: Take the Division of Labor With You
Next week I will open-source the game's full code on GitHub, together with more complete production details — stay tuned.
Looking back at the whole pipeline, what is worth taking away is not any single tool but the division of labor: image models own "what it looks like", 3D generation models own "what it is", coding models own "how it moves and plays", and an independent review agent owns "whether it is right". Each stage has its own acceptance check — reference sheets, quad topology, basic-motion tests, multi-camera blind review — which is what keeps AI production from degenerating into rerolling a gacha. Build this structure and you can make far more than one Little Prince.
Source: X (Twitter) article by Sac (@Saccc_c), "Hands-On: Building a 3D Game with Opus 5.5 / Astra + Tripo" (x.com/Saccc_c/status/2110694725640474759, 2026-10-15); the game is live at littleprince.dev. This post is a full adaptation; all images and video are from the original.
Source:X @Saccc_chttps://x.com/Saccc_c/status/2110694725640474759